It started with a Tweet…
I promised on Twitter that I would write this post if I had 20 peoples interest…

Background
We had a requirement to deploy Desktop Shortcuts, to the Windows 10 Public Desktop, for a new application. The shortcut was deployed using Group Policy Preferences (GPP). Below is a link to a nice article showing you how to do this:-
There was also a requirement to publish a “Custom” icon for each Desktop Shortcut.
Why use a Configuration Item?
With SCCM there are lots of ways to “skin the cat”. We can use an Application to deploy a single icon file and have the Application Detection Method detect the icon file. If the file doesn’t exist it would get deployed to the client – nice and easy. Equally, we could use a Configuration Item for our detection logic (does the icon file exist) and then deploy a Package/Application, that puts the icon on the client, for any client that fails the Configuration Baseline Evaluation.
The purpose of this post is to show you how you “could” use Configuration Items in your Windows 10 environment. I have picked a relatively simple example and some may argue:-
“Ben, why don’t you just use GPP’s for the Shortcut and an Application to deliver the custom .ico file?”
I could!……. But i’m showing off Configuration Items 🙂
By the end of this post, I hope you will have a better understanding of how useful and flexible Configuration Items and Baseline are.
What does this post cover?
- Brief overview of Configuration Items and Configuration Baselines
- Create an Application for the Custom Desktop Icon
- Create an Application for the Desktop Shortcut
- Create a Configuration Item/Baseline to detect if the Desktop Icon exists
- Create a Configuration Item/Baseline to detect if the Desktop Shortcut exists
- Understanding the Configuration Baseline Results
- Re-mediate any client that fails the Configuration Baseline Evaluation for the Desktop Icon
- Re-mediate any client that fails the Configuration Baseline Evaluation for the Desktop Shortcut
1. Brief overview of Configuration Items and Configuration Baselines ⏏
Before we begin, it may help you to get an overview of Configuration Items (CI’s) and Configuration Baselines CB’s).
Configuration Item (CI)
A CI defines a collection of “Settings” that must meet a specific Condition (Compliance Rule) for that item to be then marked as Compliant.
Example
- “File C:\Icon\Icon1.ico” ( <= Setting) “Does the file Exist?” ( <= Compliance Rule)
- “Registry Item HKLM\Software\PayRise /v Amount” ( <= Setting) “Does it = £1,000,000?” ( <= Compliance Rule)
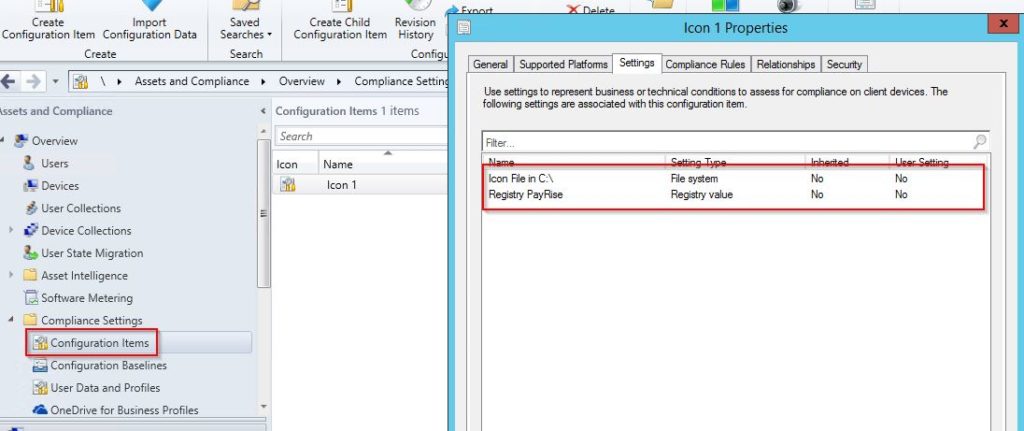
We can use the following settings when creating a CI:-
- Active Directory Query
- Assembly
- File System (<= Using this one in our post)
- IIS Metabase
- Registry Key
- Registry Value
- Script
- SQL Query
- WQL Query
- XPath Query
Different Settings will allow different remediation options. Some “Non Compliant” Settings can “Self Heal” in order to become Compliant.
Configuration Baseline (CB)
A CB is a collection of CI’s that will be deployed to and evaluated by your clients. Upon evaluation of each of the CI’s in the CB, a result of “Compliant” is returned only if ALL the CI’s in the CB are evaluated as “Compliant”. If only some of the CI’s are evaluated as “Compliant” the overall evaluation will be “Not Compliant”. It is therefore important that you take care when deciding a CI’s membership with a CB.
When will the Client evaluate the CB?
When you deploy a CB to a Collection, you can specify an evaluation schedule. The default Evaluation Schedule is 7 Days. Care should be taken when considering the Evaluation Schedule, especially if you are deploying scripts that could invoke lots of system resources. Do you really want to be checking for that Desktop Icon every minute?
When the Compliance of a CB is reported back to the server, we can create a Collection for all Clients that report the same Compliance status! Some CI Settings, like File System, are unable to automatically re-mediate so we create a Collection for our non Compliant Clients and we can then re-mediate them with other tools from the SCCM arsenal
2. Create an Application for the Custom Desktop Icon ⏏
In this section we will create an Application to deploy out custom .ico file
I like creating Applications to deliver files to Clients. Here are just a few reasons why:-
- CCMCache. We can leverage Branche Cache, Peer Cache, Johnny Cash (SIC) and BITS throttling when delivering files to clients
- We can use the same Application in a Task Sequence to deliver the same file during a IPU or Wipe and load OSD – less duplication = less admin work = more time to drink coffee
- An Application allows me to identify if the file exists before it downloads to the clients local cache
Prerequisites
- Before we create the Application, place your custom .ico file and icon installation script on your normal “Content Location” UNC share (Step 8 has more details on what your “Content Location” folder should look like.
- On your Admin machine, also place your custom .ico file in C:\Windows\Icons (You will need to create this folder). We will need this in place for when we create our Desktop Shortcut later.
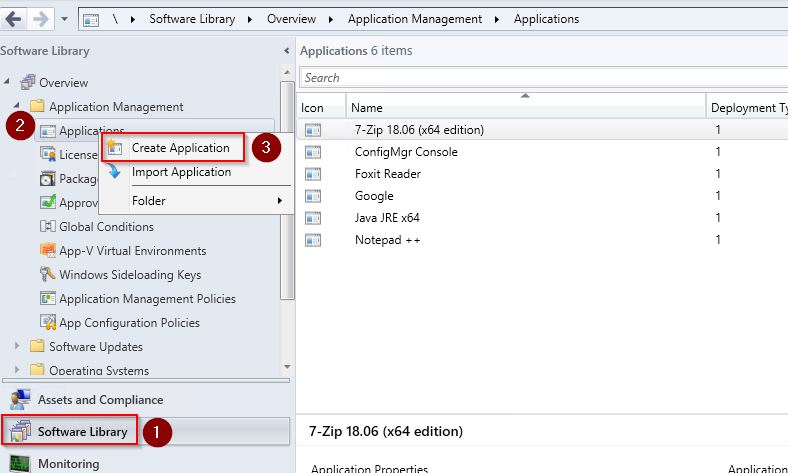
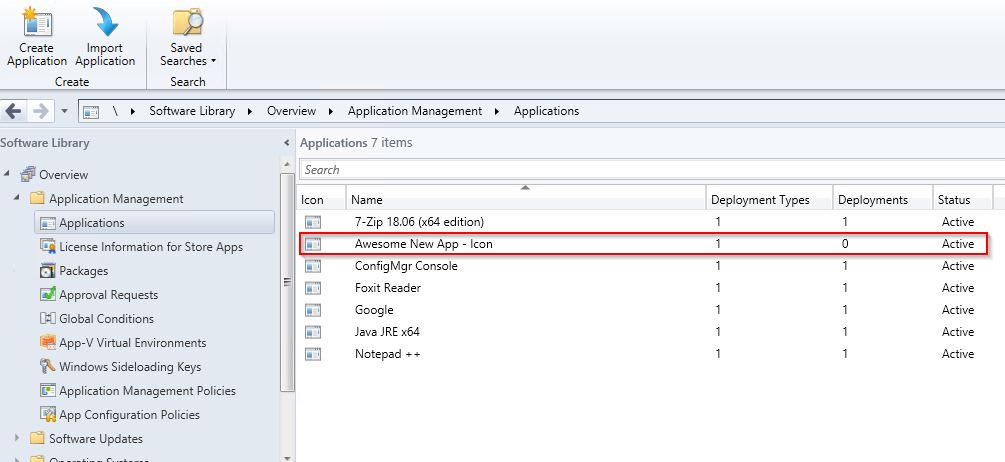
1 . From the SCCM Admin Console, navigate to Software Library > Applications. Right Click Applications and choose Create Application
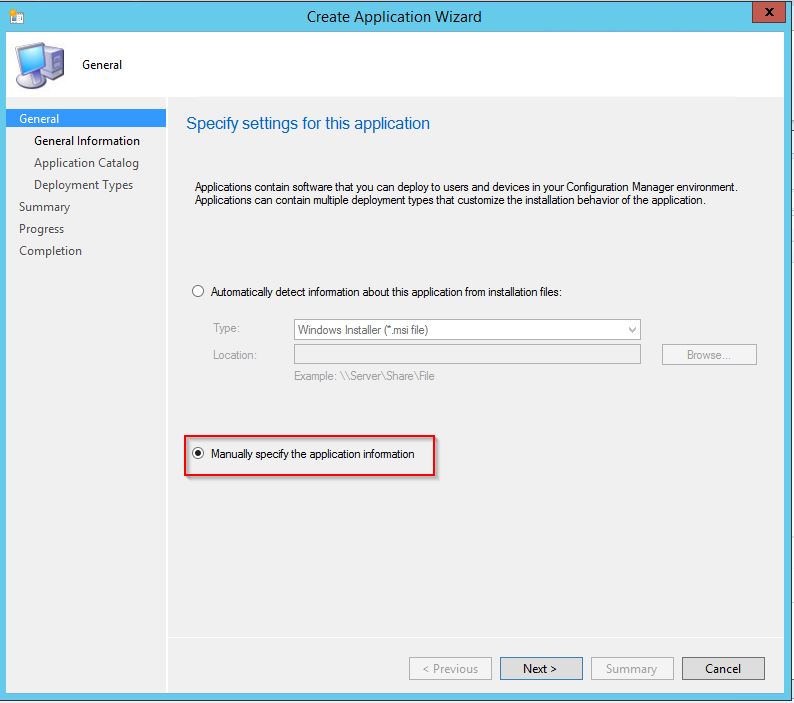
2 . In the Create Application Wizard, choose Manually Specify the Application Information and click Next
3 . Choose a Name for the new Application and click Next
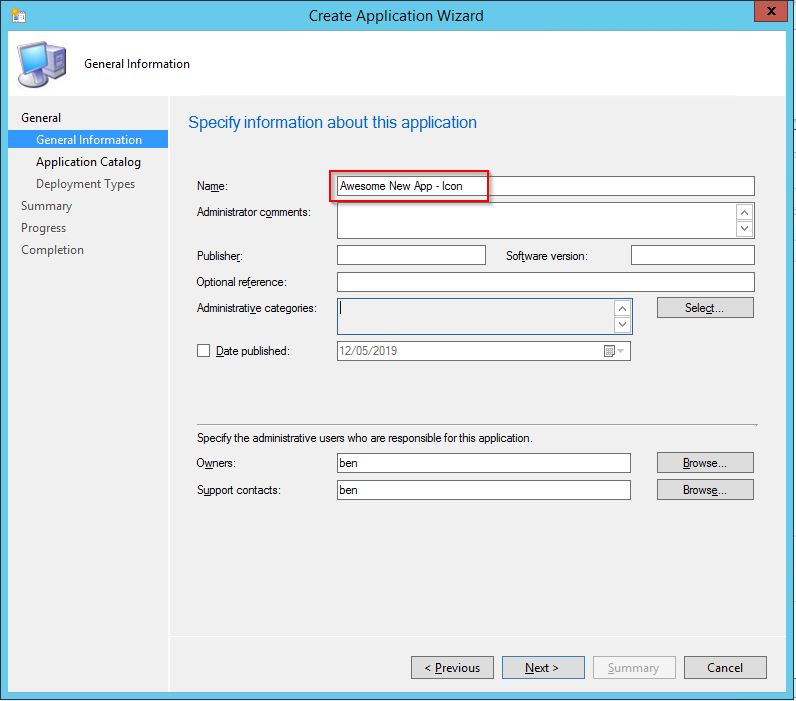
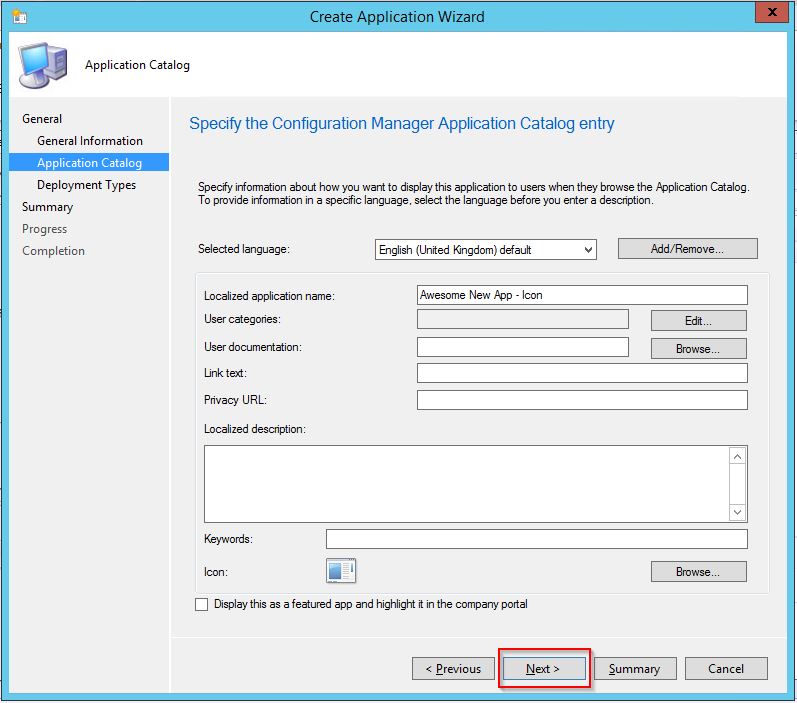
4 . We are not going to Display this Application in the Catalog so no need for a shiny icon or description. Click Next
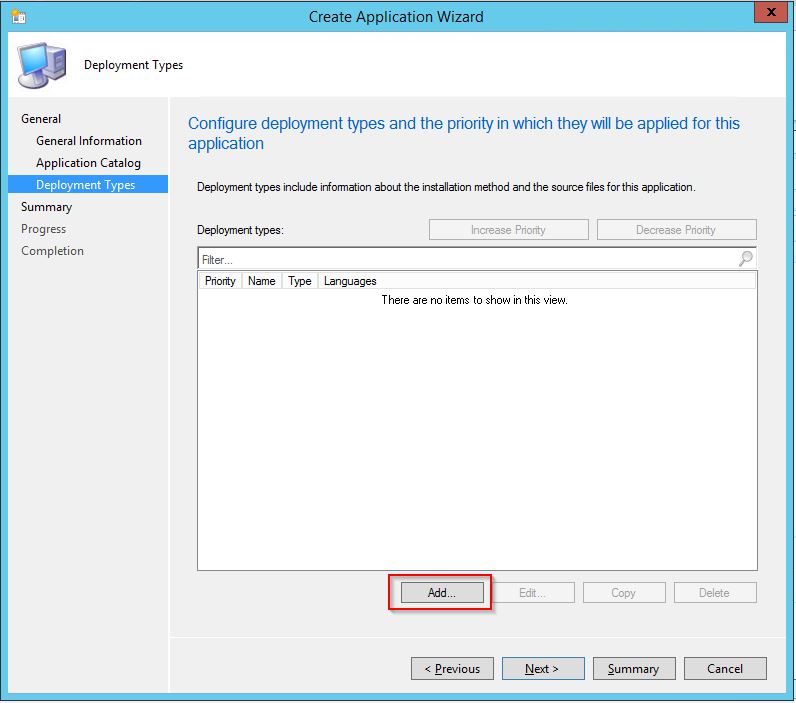
5 . We need to add a Deployment Type so click Add
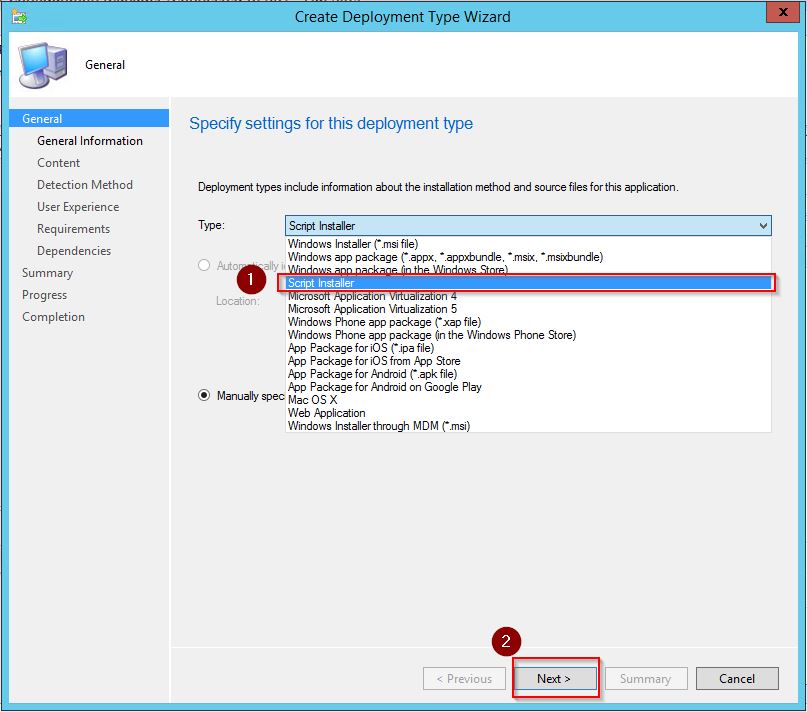
6 . Choose Script Installer from the Deployment Type drop down box and click Next
7 . Give the Deployment Type a Name and click Next
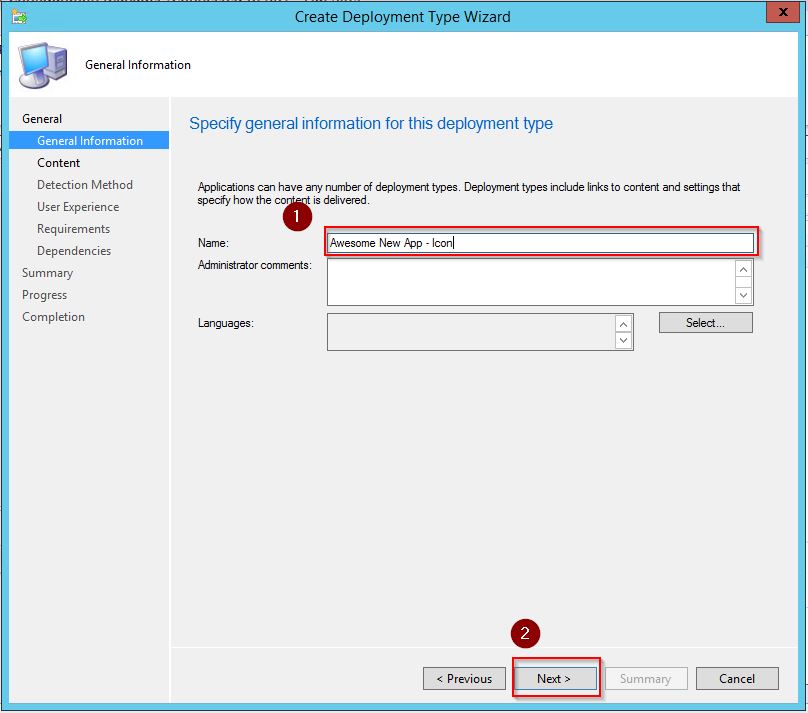
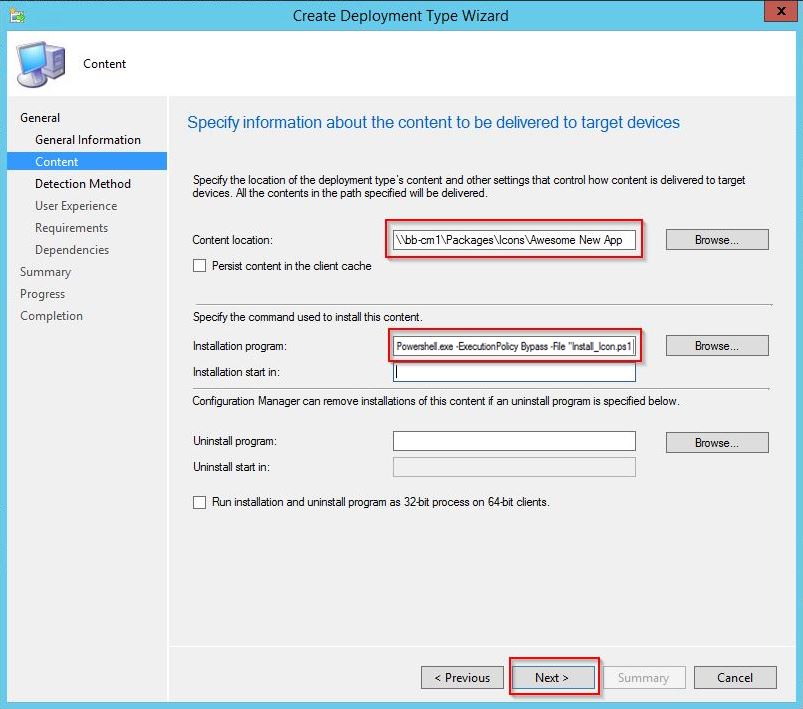
8 . Specify the Application Content Location and Installation Program and click Next
Content Location: “\\contentserver\share\Icons\Awesome New App”
Installation Program: Powershell.exe -ExecutionPolicy Bypass -File “Install_Icon.ps1”
* When the Application is deployed, we will use a script to copy the .ico from the ccmcache folder to another local folder on the client. By using wildcards, we can re-use the same script when we look at deploying other .ico files to clients. An example of what the contents of the “Install_Icon.ps1” script could be is:-
|
1 2 3 |
$IconsFolder = 'C:\Windows\Icons' If (!(Test-Path -path $IconsFolder)) {New-Item $IconsFolder -Type Directory} Copy-Item *.ico $IconsFolder -Force |
Your Content Location should be looking something like this by now…

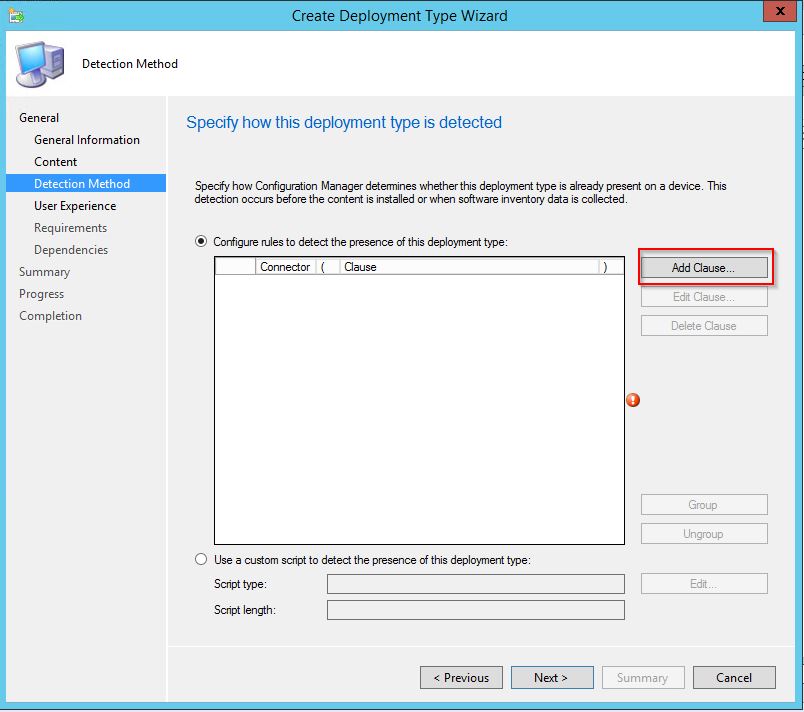
9 . Click Add Clause
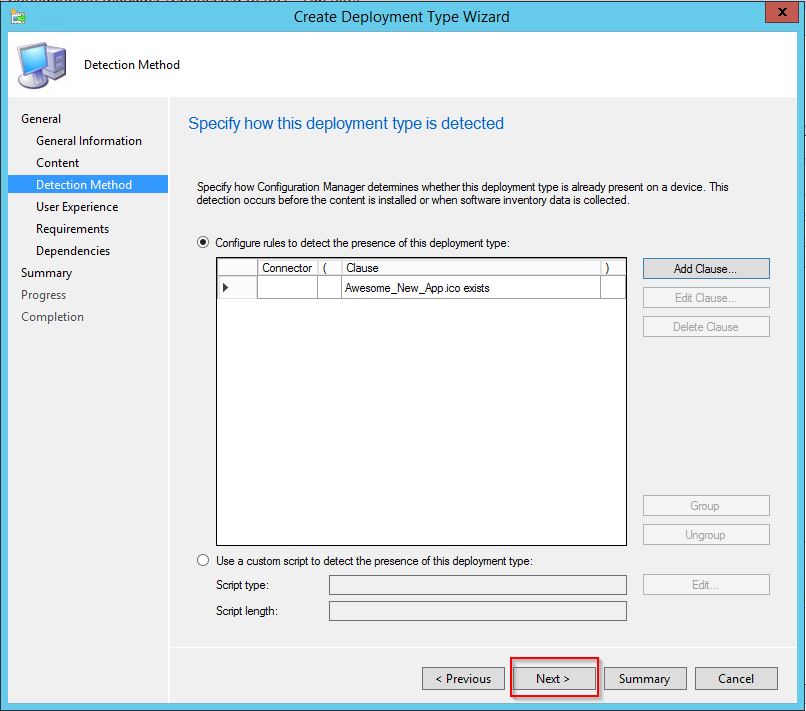
10 . Now we set the Detection Rule. Choose “FileSystem” from for the Setting Type and set the following fields:-
- Type: File
- Path: C:\Windows\Icons
- File or Folder Name Awesome_New_App_Icon.ico
Click OK

11 . Click Next
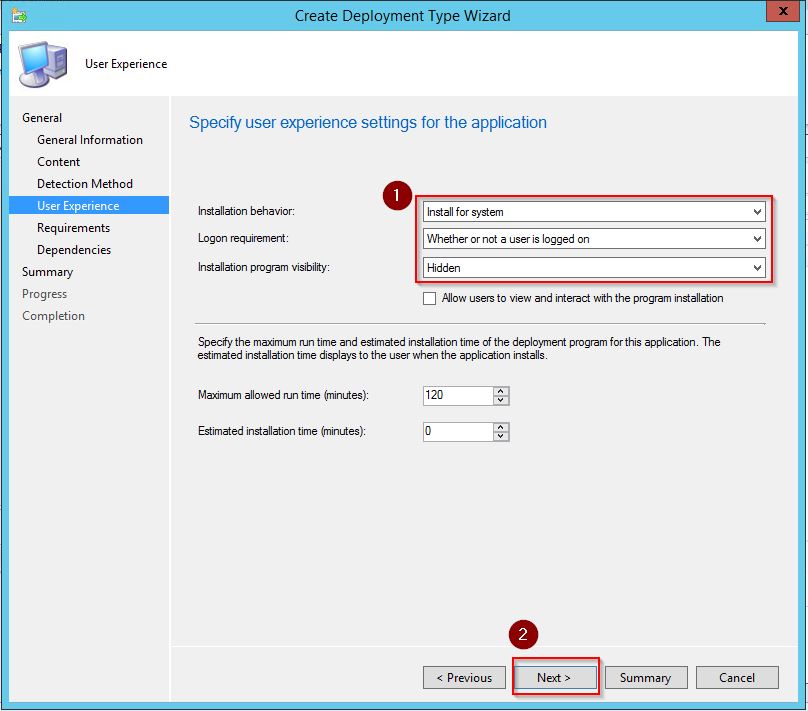
12 . Set the User Experience settings to the following values:-
- Installation Behavior: Install for System
- Logon Requirement: Whether or not a user is logged on
- Installation Program Visibility: Hidden
Click Next
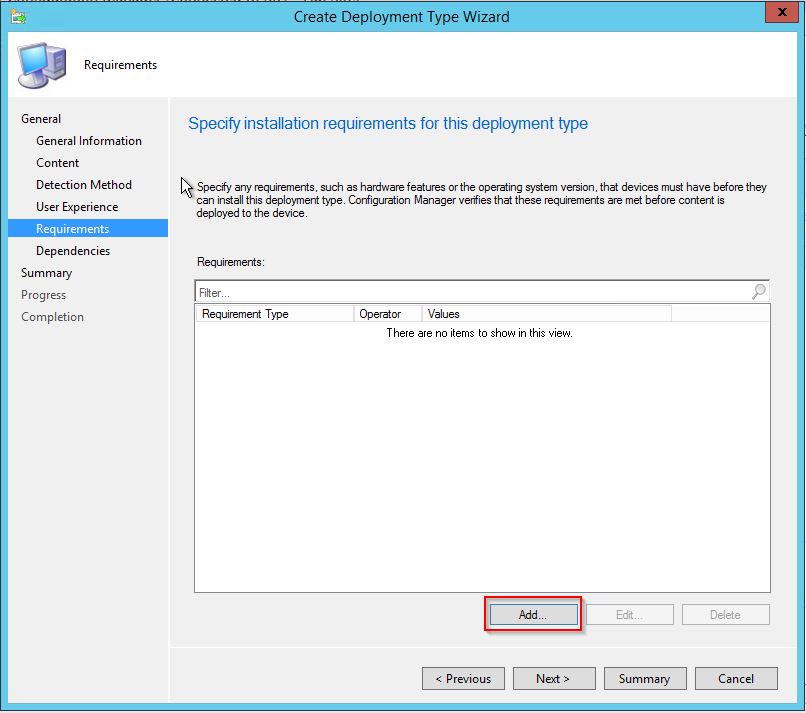
13 . Click Add on the Installation requirements for this deployment type page
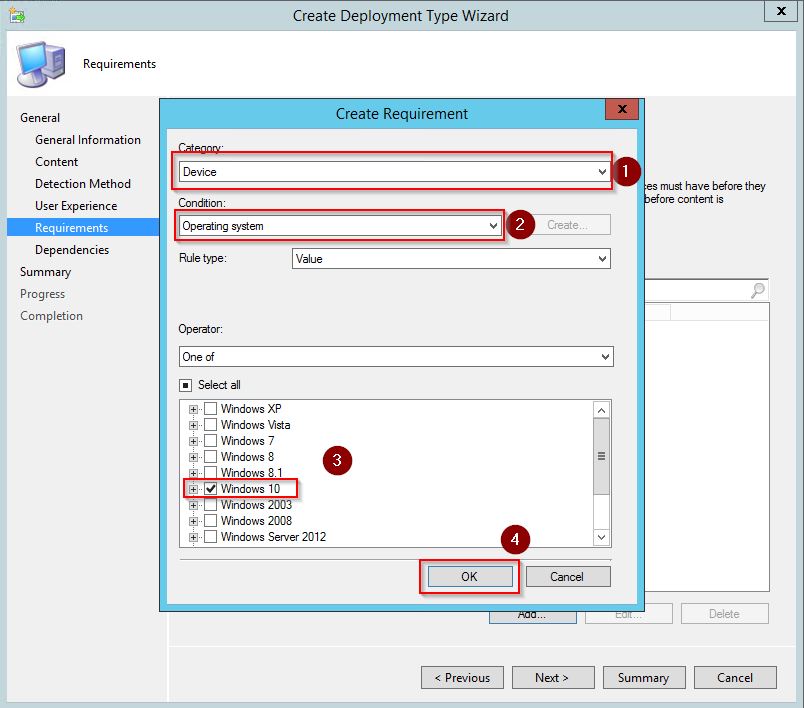
14 . On the Create Requirement page, select the following values:-
- Category: Device
- Condition: Operating System
- Operator: Windows 10
Click OK
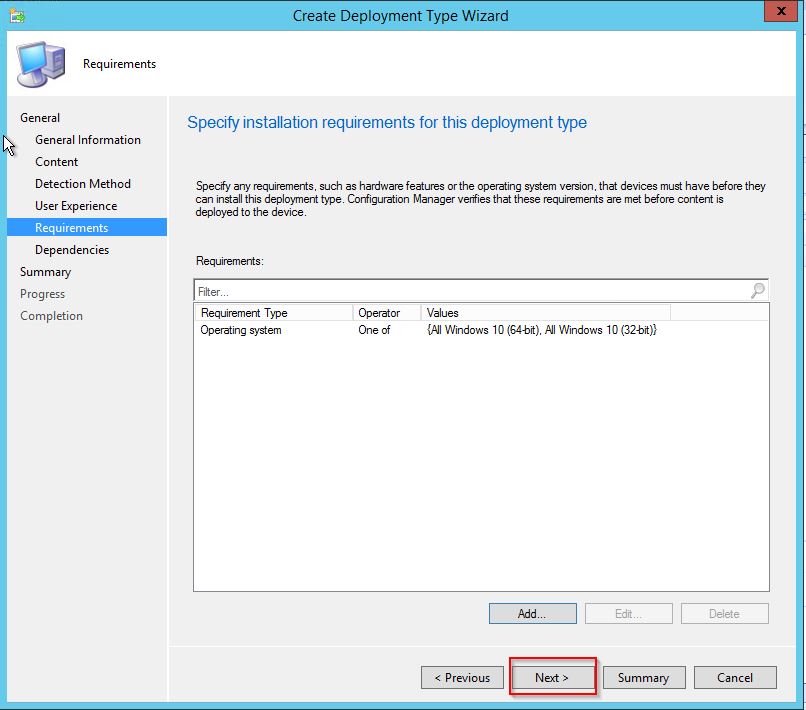
15 . Click Next
16 . Click Next on the Software Dependencies screen (we wont be setting anything here)
17 . Click Next after reviewing the Summary
18 . Click Close to complete creating the Deployment Type
19 . Click Next
20 . Click Next again
21 . Click Close to complete the Application creation process
3. Create an Application for the Desktop Shortcut ⏏
In this section we will create an Application to deploy our Desktop Shortcut. The steps are very similar to the previous section so we will omit screenshots.
For the benefit and simplicity of this post, I am using a shortcut for calc.exe
Prerequisites
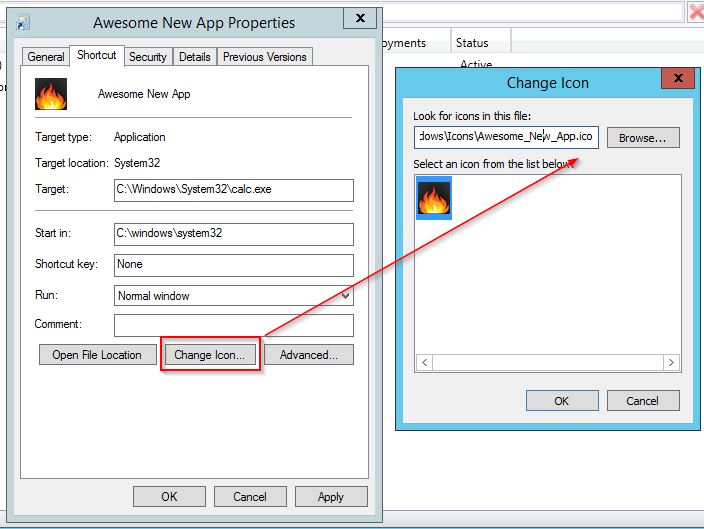
In the previous section we created an Application to deploy our custom .ico. We need to ensure that the Desktop Shortcut we create for use in this section points to the correct .ico file on our clients.
- Ensure the icon reference of the shortcut points to C:\Windows\Icons\Awesome_New_App.ico
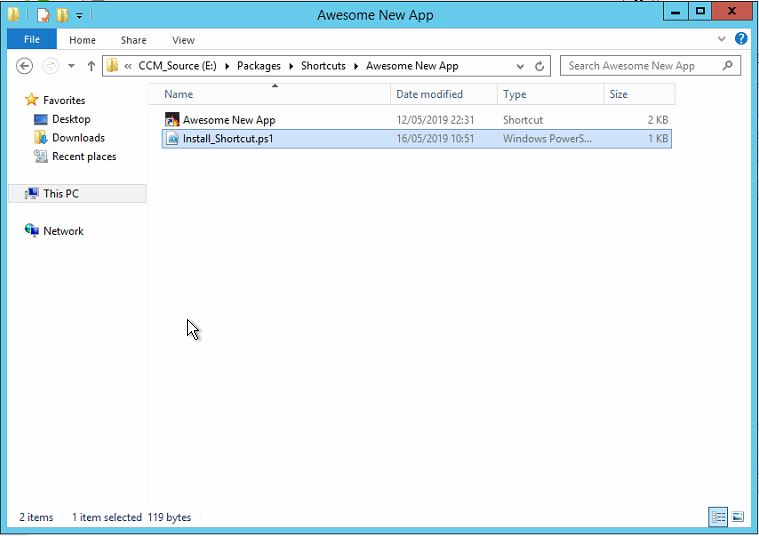
- Place your Desktop Shortcut and Desktop Shortcut installation script on your normal “Content Location” UNC share.
(Step 8 has more details on what your “Content Location” folder should look like.
1 . From the SCCM Admin Console, navigate to Software Library > Applications.Right Click Applications and choose Create Application
2 . In the Create Application Wizard, choose Manually Specify the Application Information and click Next
3 . Choose a Name for the new Application and click Next e.g. Awesome New App – Shortcut
4 . We are not going to Display this Application in the Catalog so no need for a shiny icon or description. Click Next
5 . We need to add a Deployment Type so click Add
6 . Choose Script Installer from the Deployment Type drop down box and click Next
7 . Give the Deployment Type a Name and click Next e.g. Awesome New App – Shortcut
8 . Specify the Application Content Location and Installation Program and click Next
Content Location: “\\contentserver\share\Shortcuts\Awesome New App”
Installation Program: Powershell.exe -ExecutionPolicy Bypass -File “Install_Shortcut.ps1”
* When the Application is deployed, we will use a script to copy the .lnk from the ccmcache folder to the Public Desktop on the client. By using wildcards, we can re-use the same script when we look at deploying other .lnk files to clients. An example of what the contents of the “Install_Shortcut.ps1” script could be is:-
|
1 2 |
$PublicDesktop = 'C:\Users\Public\Desktop' If (Test-Path -path $PublicDesktop) {Copy-Item *.lnk $PublicDesktop -Force} |
9 . Click Add Clause
10 . Now we set the Detection Rule. Choose “FileSystem” from for the Setting Type and set the following fields:-
- Type: File
- Path: C:\Users\Public\Desktop
- File or Folder Name Awesome New App.lnk
Click OK
11 . Click Next
12 . Set the User Experience settings to the following values:-
- Installation Behavior: Install for System
- Logon Requirement: Whether or not a user is logged on
- Installation Program Visibility: Hidden
Click Next
13 . Click Add on the Installation requirements for this deployment type page
14 . On the Create Requirement page, select the following values:-
- Category: Device
- Condition: Operating System
- Operator: Windows 10
Click OK
15 . Click Next
16 . Click Next on the Software Dependencies screen (we wont be setting anything here)
17 . Click Next after reviewing the Summary
18 . Click Close to complete creating the Deployment Type
19 . Click Next
20 . Click Next again
21 . Click Close to complete the Application creation process
4. Create a Configuration Item/Baseline to detect if the Desktop Icon exists ⏏
In this section we will create a Configuration Item and Baseline to evaluate if the required .ico file is on the client
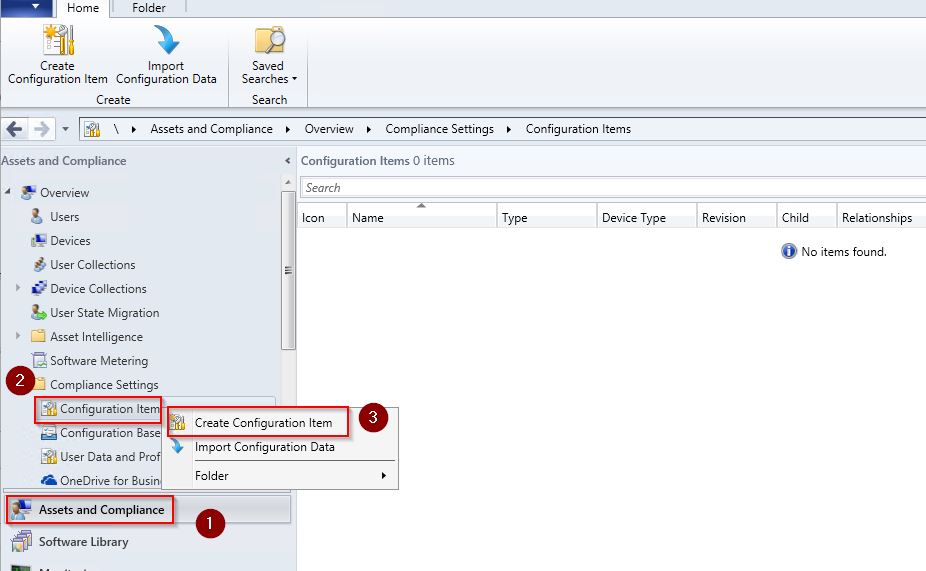
1 . From the SCCM Admin Console, navigate to Assets and Compliance > Compliance Settings > Configuration Items > Create Configuration Item
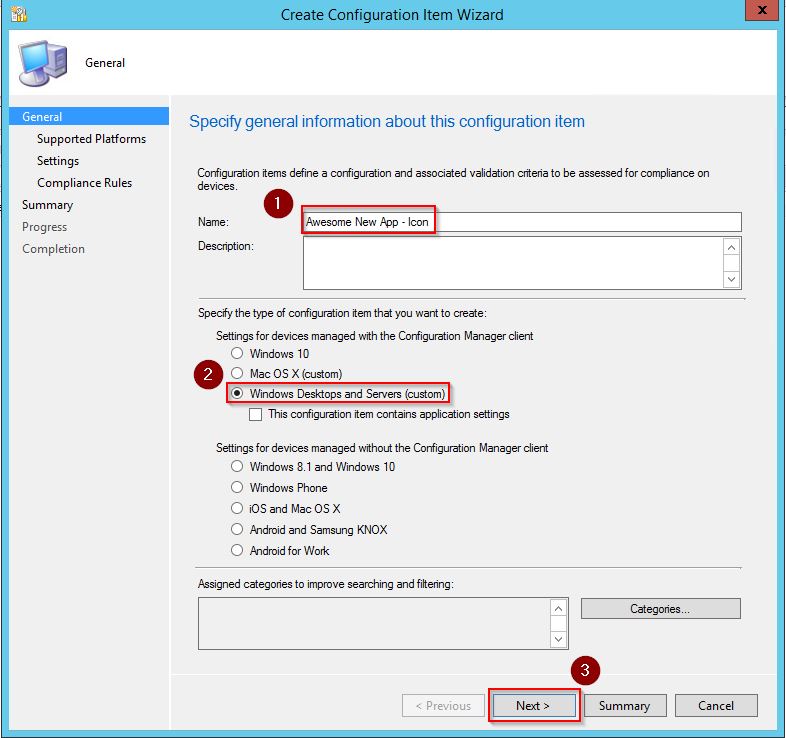
2 . Specify general information about the CI
- Name: Awesome New App – Icon
- Type of Configuration: Windows Desktops and Servers (custom)
Click Next
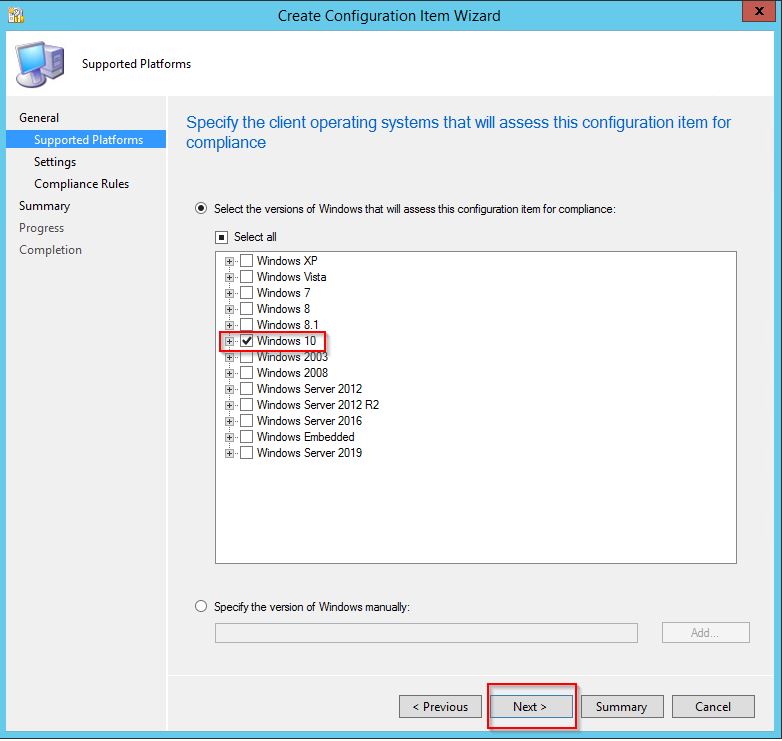
3 . Choose your supported platforms, in our case Windows 10, and click Next
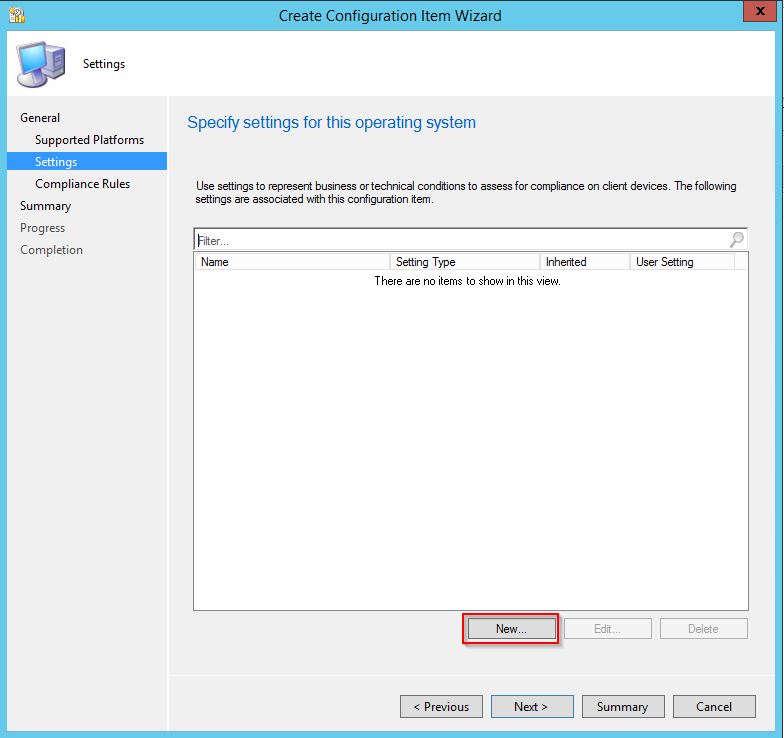
4 . Click New to add a setting for us to evaluate in this CI
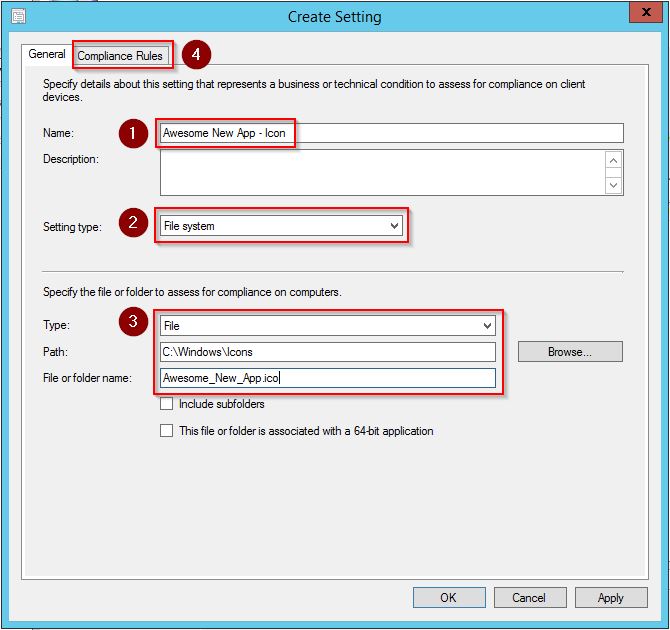
5 . Add the following information into your CI Setting. Remember the Setting is the item you are looking to evaluate. In our case we are going to evaluate C:\Windows\Icons\Awesome_New_App.ico as specified in Section 2
- Name: Awesome New App – Icon
- Setting Type: File system
- Path: C:\Windows\Icons
- File or Folder Name: Awesome_New_App.ico
Click the Compliance Rules tab
6 . Click New
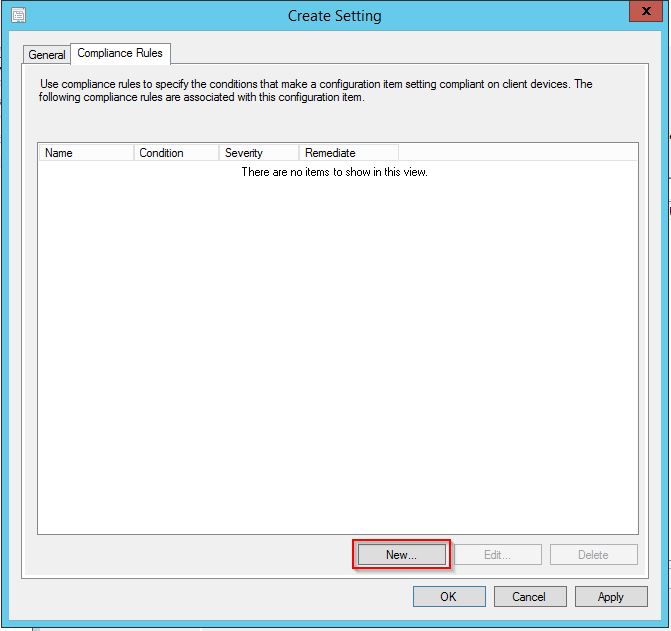
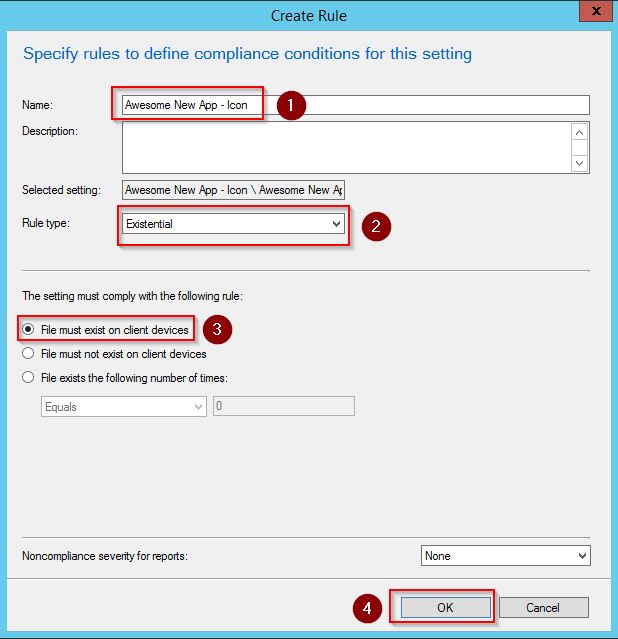
7 . Specify the following Compliance Rule settings
- Name: Awesome New App – Icon
- Rule Type: Existential
- Setting: File must exist on client devices
Click OK
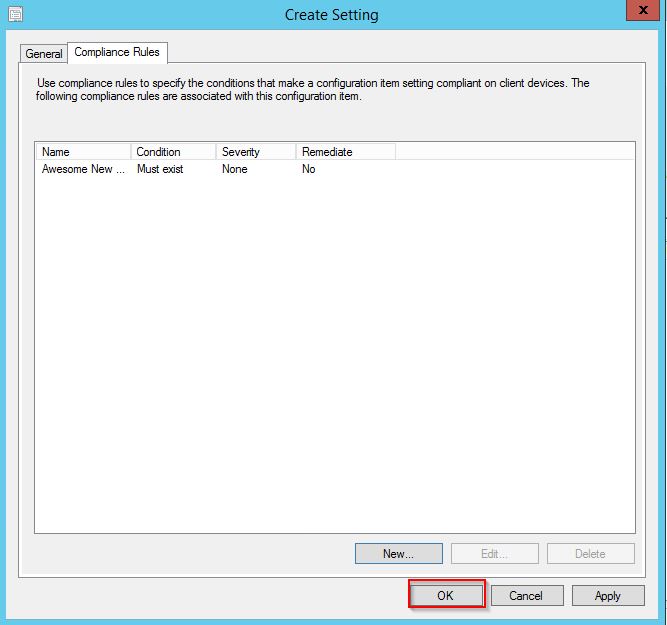
8 . Click OK
9 . Click Next
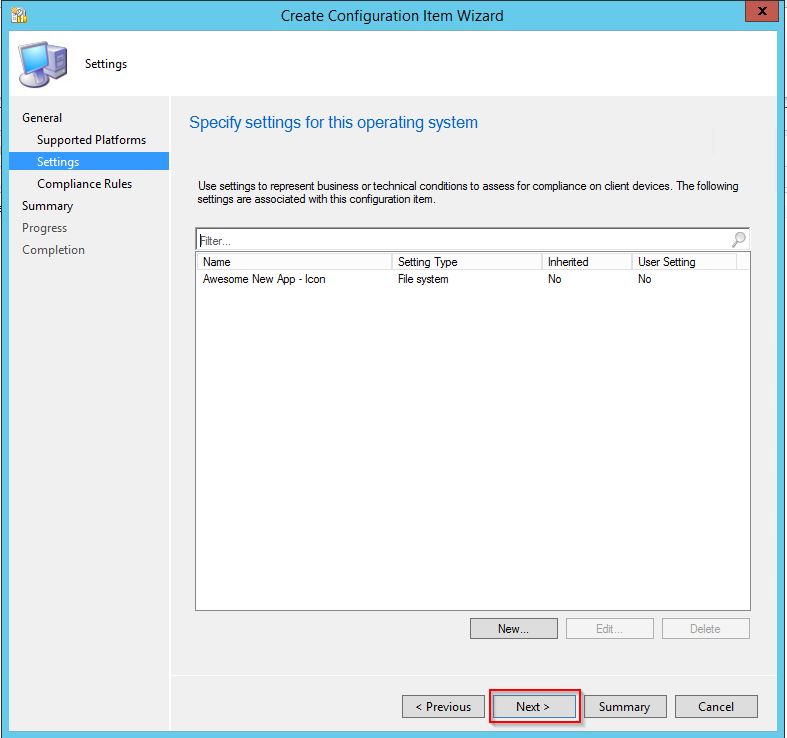
10 . Click Next

11 . Click Next
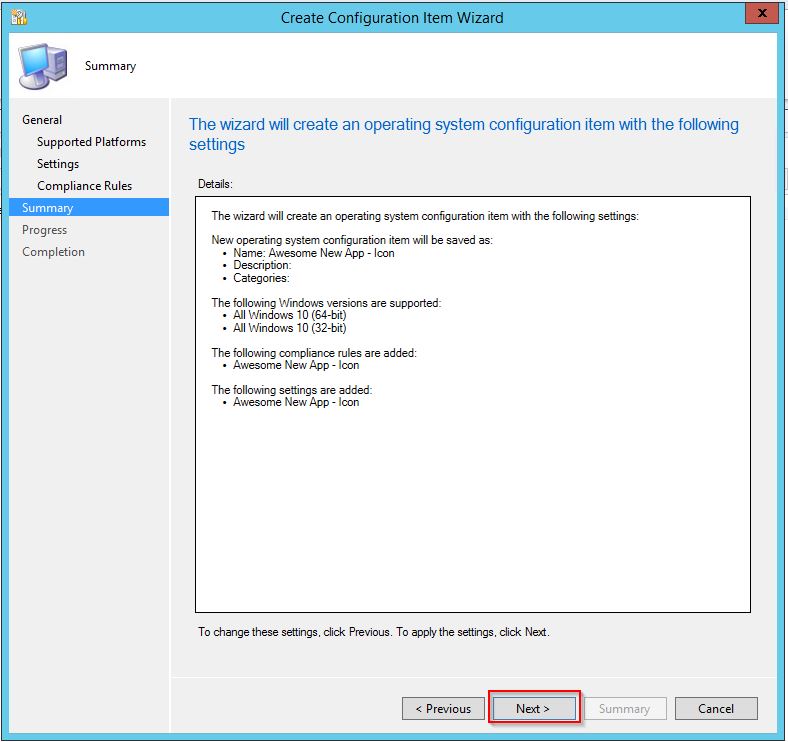
12 . Click Close
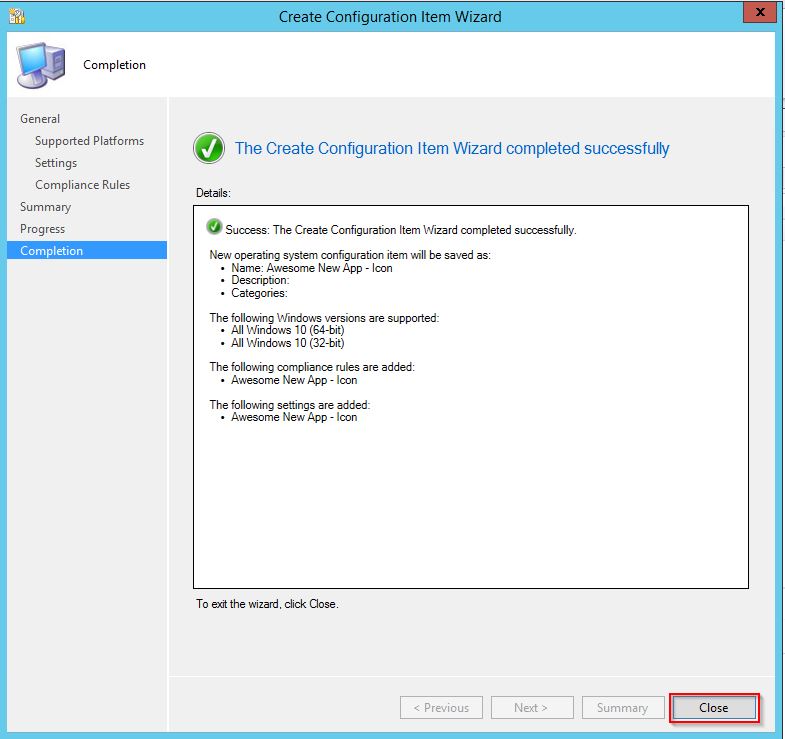
Now that we have created the CI we can go ahead to create the CB to deploy to our clients
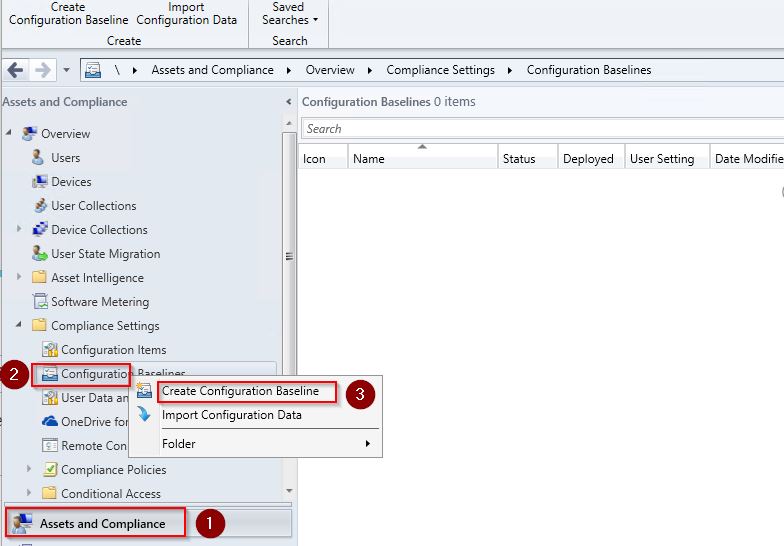
13 . From the SCCM Admin Console, navigate to Assets and Compliance > Compliance Settings > Configuration Baselines > Create Configuration Baseline
14 . Give the CB a name e.g. Awesome New App – Icon

15 . Click Add > Configuration Items, select the CI we created previously and click Add
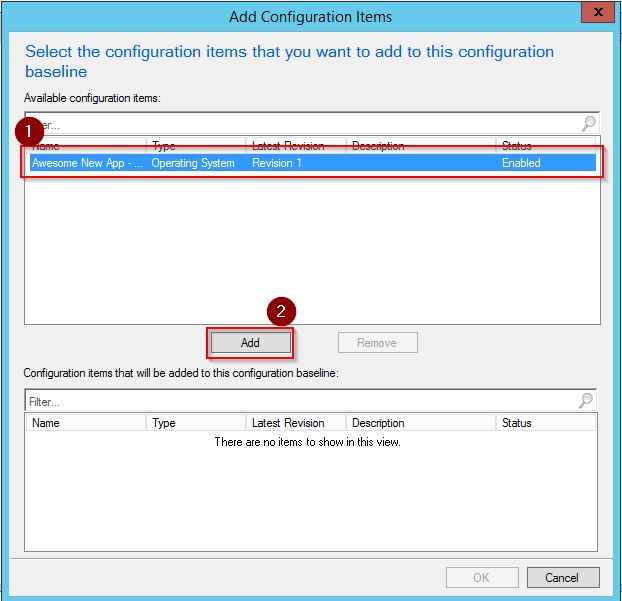
16 . Click OK
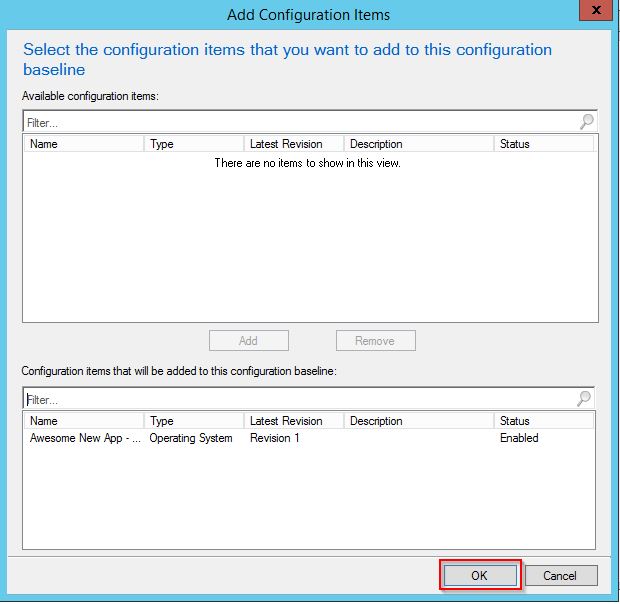
17 . Click OK

18 . Select your new CB and click Deploy from the ribbon toolbar
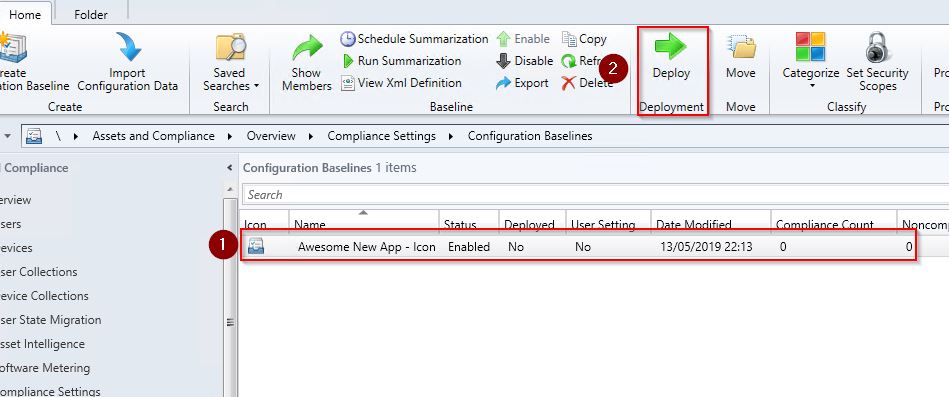
19 . Click Browse to select the Collection to deploy this CB to
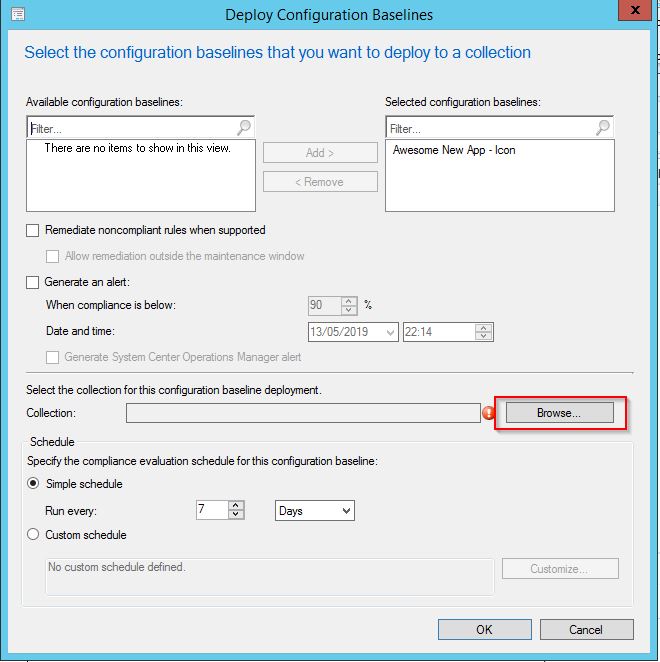
20 . Select your desired Collection to deploy this CB to and click OK

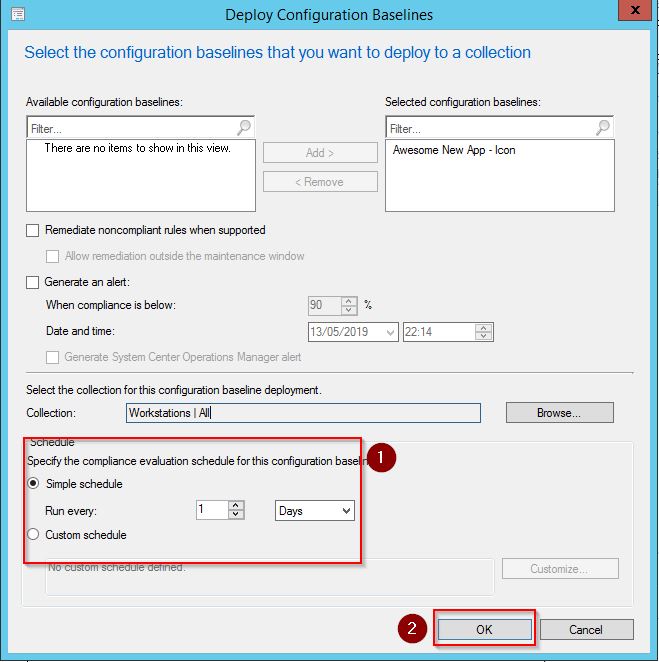
21 . Select an Evaluation Schedule. This is how often your client will evaluate the CB. In this example, we will evaluate the CB once per day
Click OK
5. Create a Configuration Item/Baseline to detect if the Desktop Shortcut exists ⏏
In this section we will create a Configuration Item and Baseline to evaluate if the required .lnk file is on the clients Public Desktop. The process is similar to Section 4 so we will omit screenshots
1 . From the SCCM Admin Console, navigate to Assets and Compliance > Compliance Settings > Configuration Items > Create Configuration Item
2 . Specify general information about the CI
- Name: Awesome New App – Shortcut
- Type of Configuration: Windows Desktops and Servers (custom)
Click Next
3 . Choose your supported platforms, in our case Windows 10, and click Next
4 . Click New to add a setting for us to evaluate in this CI
5 . Add the following information into your CI Setting. Remember the Setting is the item you are looking to evaluate. In our case we are going to evaluate “C:\Users\Public\Desktop\Awesome New App.lnk” as specified in Section 3
- Name: Awesome New App – Shortcut
- Setting Type: File system
- Path: C:\Users\Public\Desktop
- File or Folder Name: Awesome New App.lnk
Click the Compliance Rules tab
6 . Click New
7 . Specify the following Compliance Rule settings
- Name: Awesome New App – Shortcut
- Rule Type: Existential
- Setting: File must exist on client devices
Click OK
8 . Click OK
9 . Click OK
10 . Click Next
11 . Click Next
12 . Click Close
Now that we have created the CI we can go ahead to create the CB to deploy to our clients
13 . From the SCCM Admin Console, navigate to Assets and Compliance > Compliance Settings > Configuration Baselines > Create Configuration Baseline
14 . Give the CB a name e.g. Awesome New App – Shortcut
15 . Click Add > Configuration Items, select the CI we created previously and click Add
16 . Click OK
17 . Click OK
18 . Select your new CB and click Deploy from the ribbon toolbar
19 . Click Browse to select the Collection to deploy this CB to
20 . Select your desired Collection to deploy this CB to and click OK
21 . Select an Evaluation Schedule. This is how often your client will evaluate the CB. In this example, we will evaluate the CB once per day
Click OK
6. Understanding the Configuration Baseline Results ⏏
The clients will evaluate the two CB’s at the schedule you set. In our example, once per day. We can see the results of the evaluation either on the client or in the console
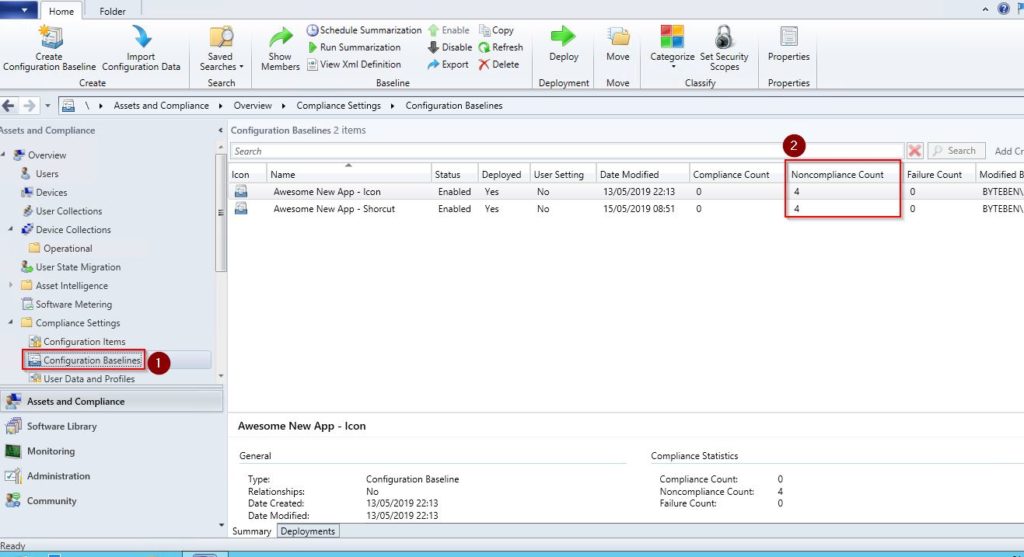
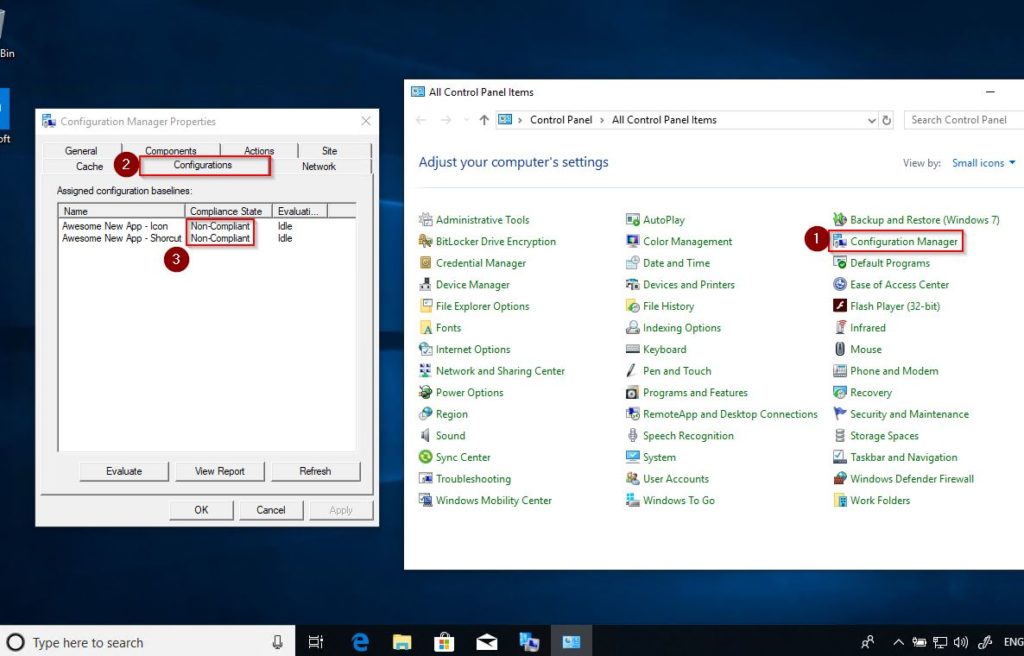
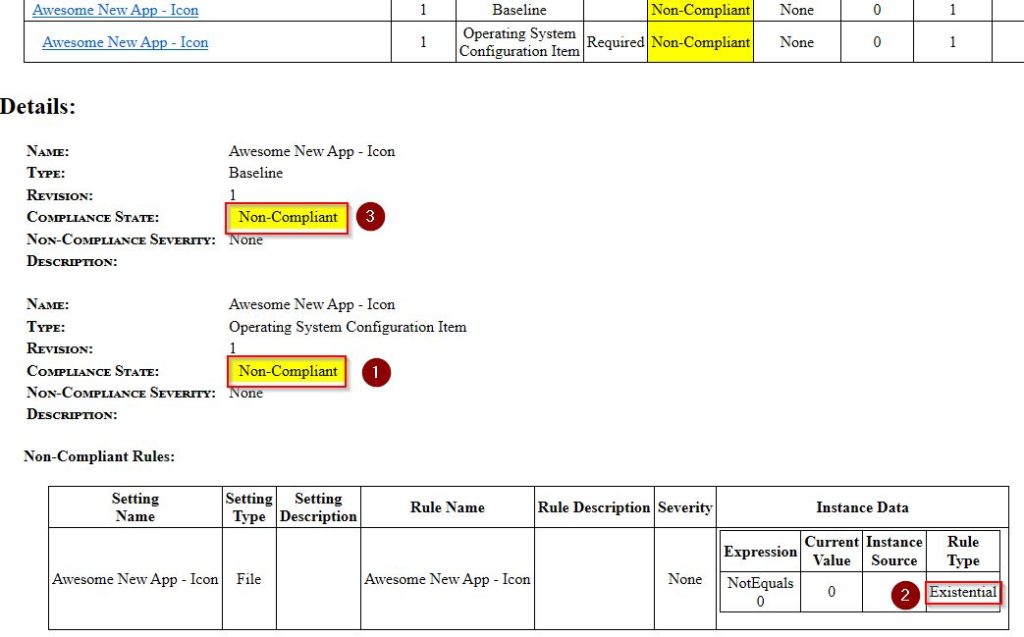
If we click View Report from the client, we can see some more information for the Compliance Result and reason for Non-Compliance
This CB evaluated as Non-Compliant because:-
- The CI was Non Compliant… because…
- The setting being evaluated (does file exist) was not present
- Because there was not 100% CI Compliance, the Baseline resulted in Non-Compliant
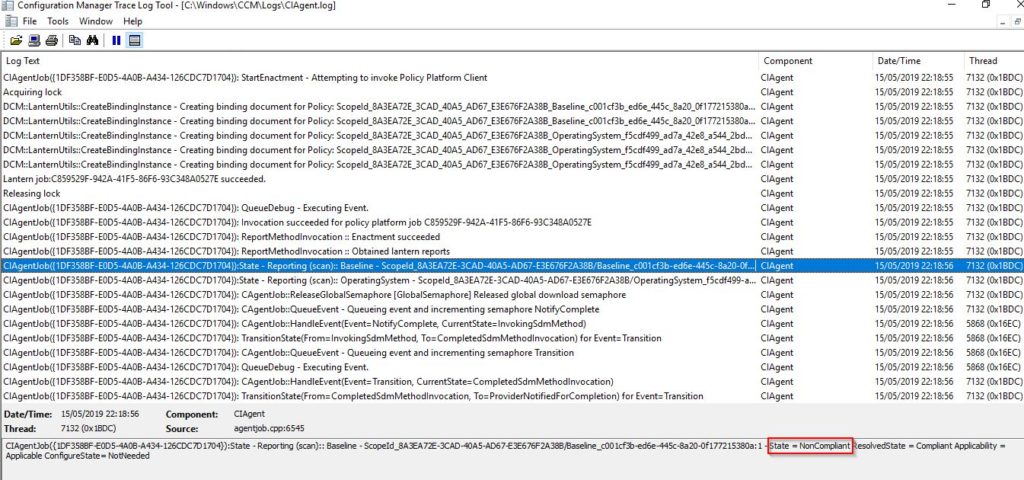
While we are here, load C:\Windows\CCM\Cmtrace.exe on the client and open C:\Windows\CCM\Logs\CIAgent.log to view the CI Evaluation log
We have established that both CB’s are Non-Compliant meaning we have neither the Desktop Shortcut or Desktop .ico file on our clients.
Some CI’s, when marked as Non-Compliant, can be set to automatically re-mediate in the CB settings. For example when using Registry Values and Scripts as Compliance Conditions
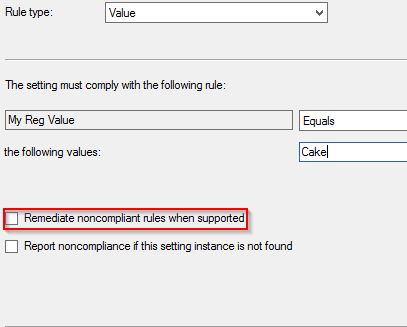
We don’t have the ability to do this when dealing with files. Isn’t it handy we created some Applications earlier! We can use these Applications to re-mediate the Non-Compliant clients
7. Re-mediate any client that fails the Configuration Baseline Evaluation for the Desktop Icon ⏏
In Section 6 we looked at the evaluation status of the CB’s in the SCCM console. We will now deploy the Application we created in Section 2 to any Non-Compliant client
1 . From the SCCM Admin Console, navigate to Assets and Compliance > Compliance Settings > Configuration Baselines
- Select the Baseline where you wish to deploy the Application Awesome New App – Icon to Non-Compliant clients
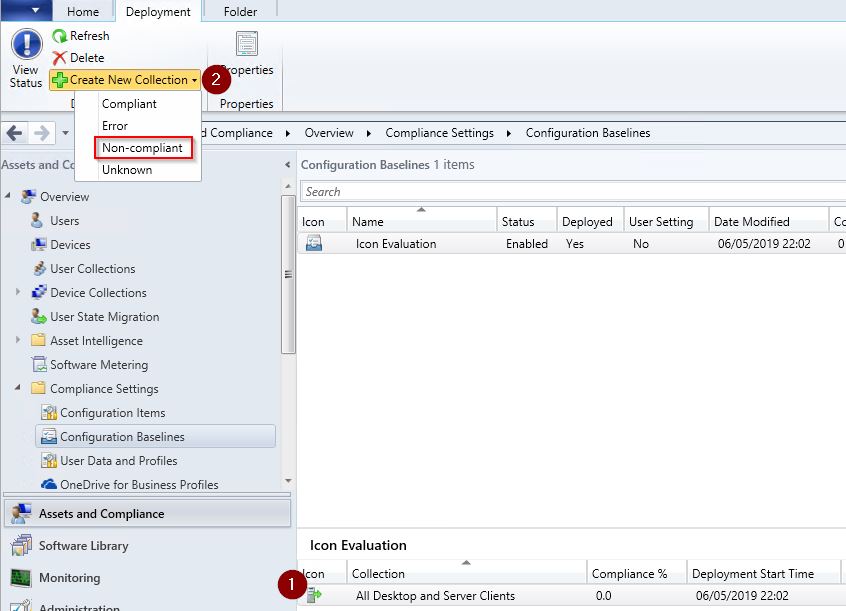
- Select the Deployments tab
- Select the Deployment
- On the Ribbon menu, click Create New Collection and choose Non-Compliant
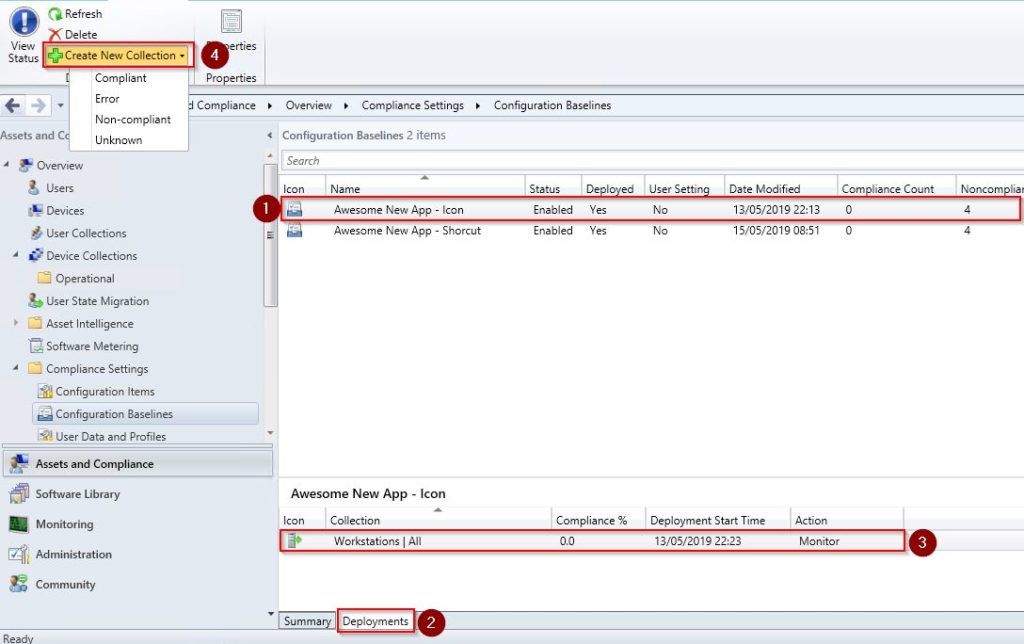
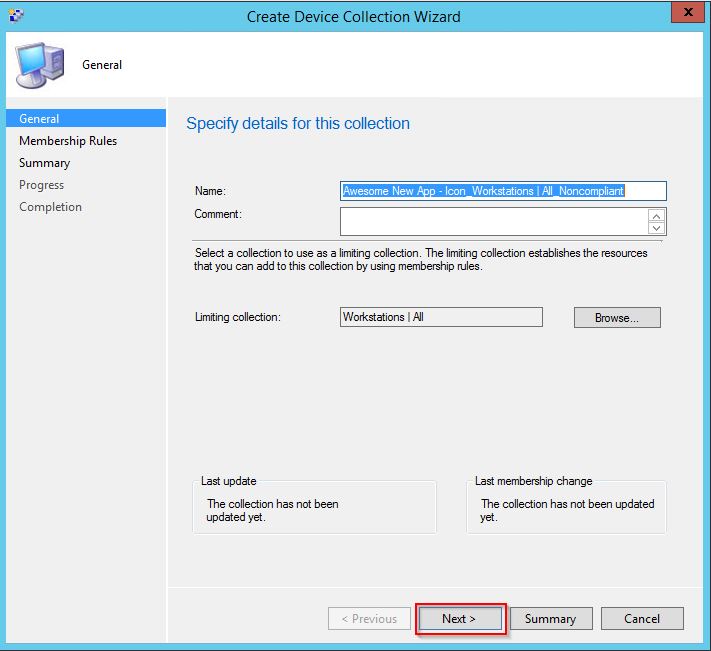
2 . In the Create Device Collection wizard, click Next
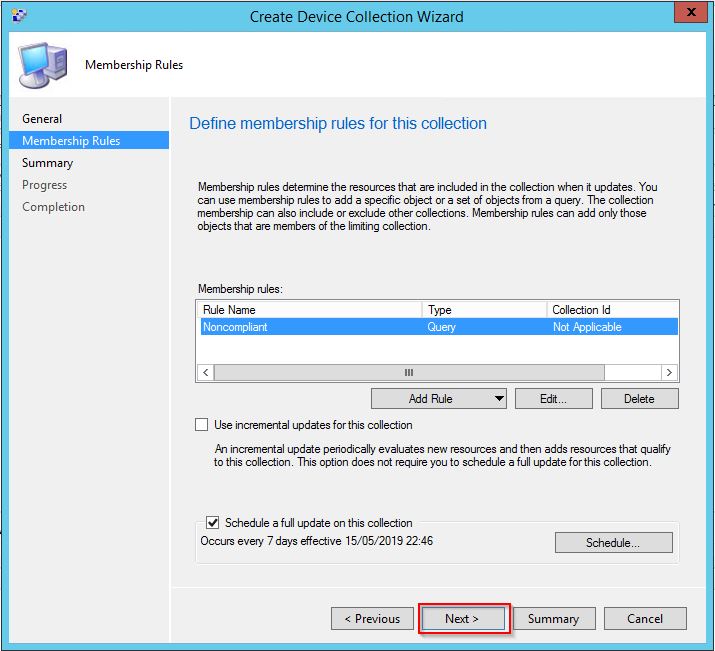
3 . In the Define Membership Rules for this Collection window, click Next
4 . Click Next in the Summary Windows
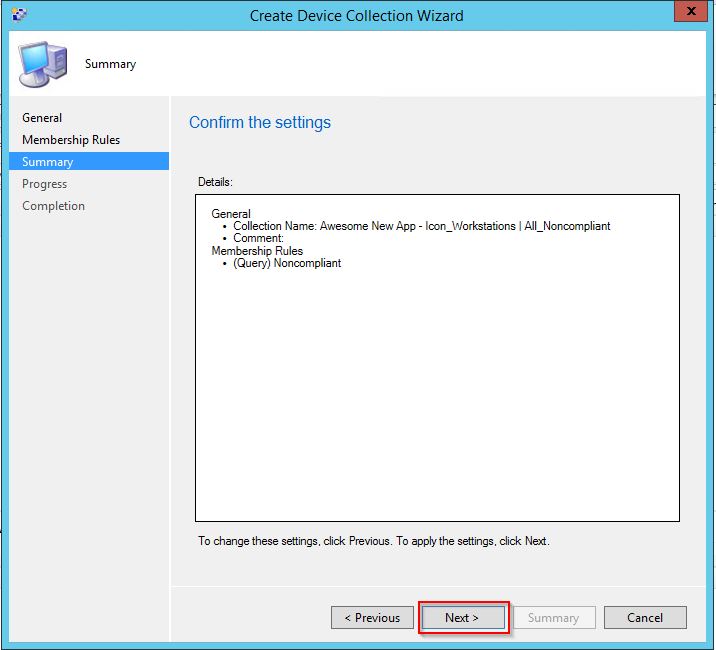
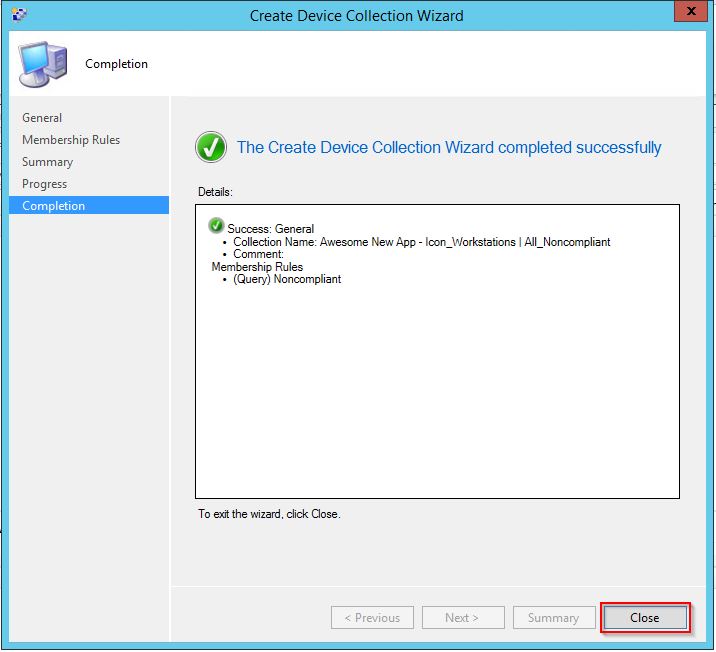
5 . Click Close to complete the Create Device Collection Wizard
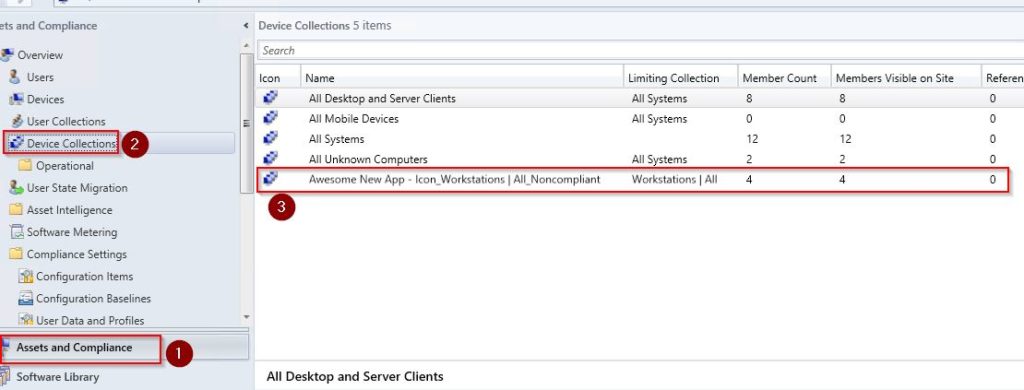
All Collections created from a CB are placed in Assets and Compliance > Device Collections > Devices and Collections
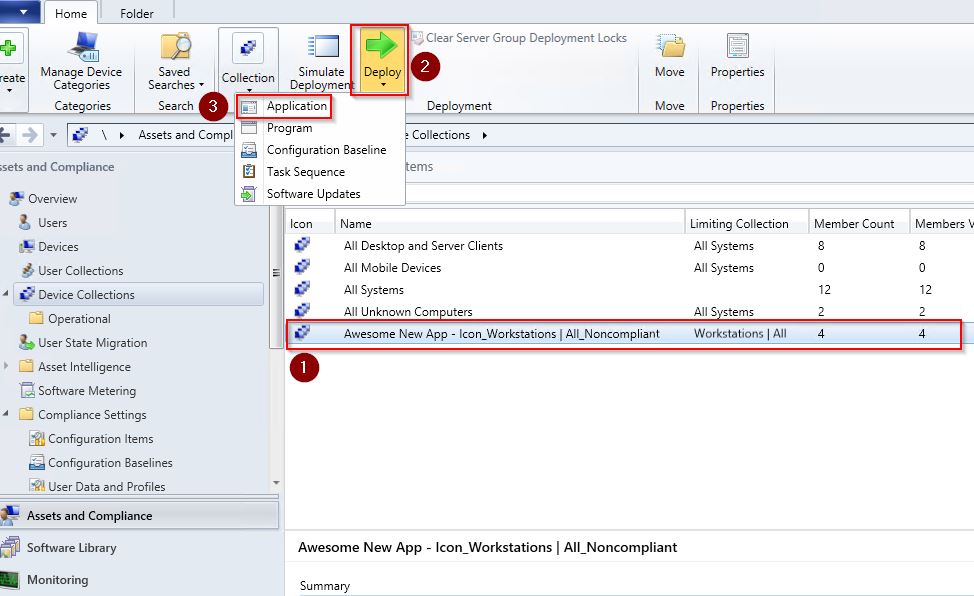
6 . To deploy our Awesome New App – Icon Application to this Collection
- Highlight the Collection
- On the Ribbon menu, click Deploy
- Select Application
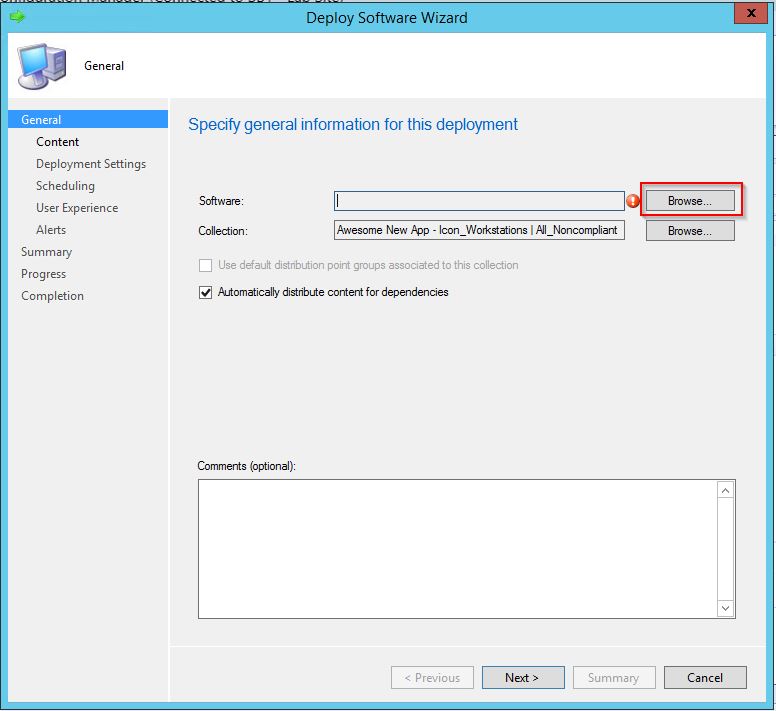
7 . In the Deploy Software Wizard, click Browse
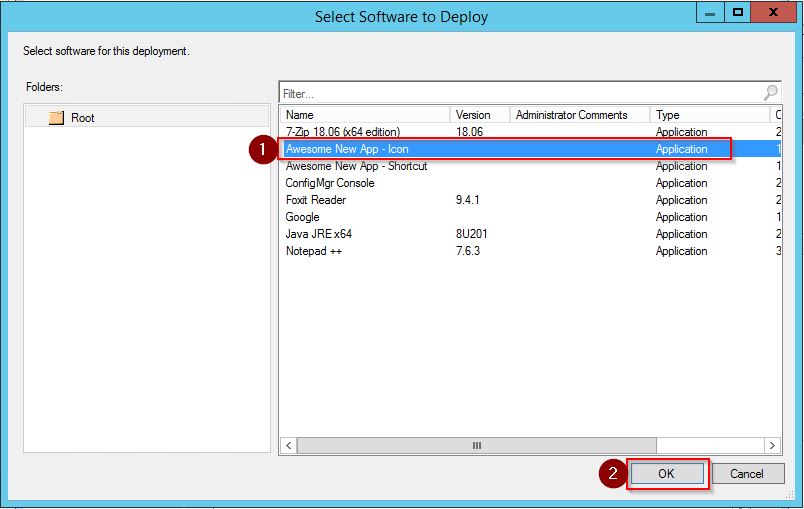
8 . Select Awesome New App – Icon and click OK
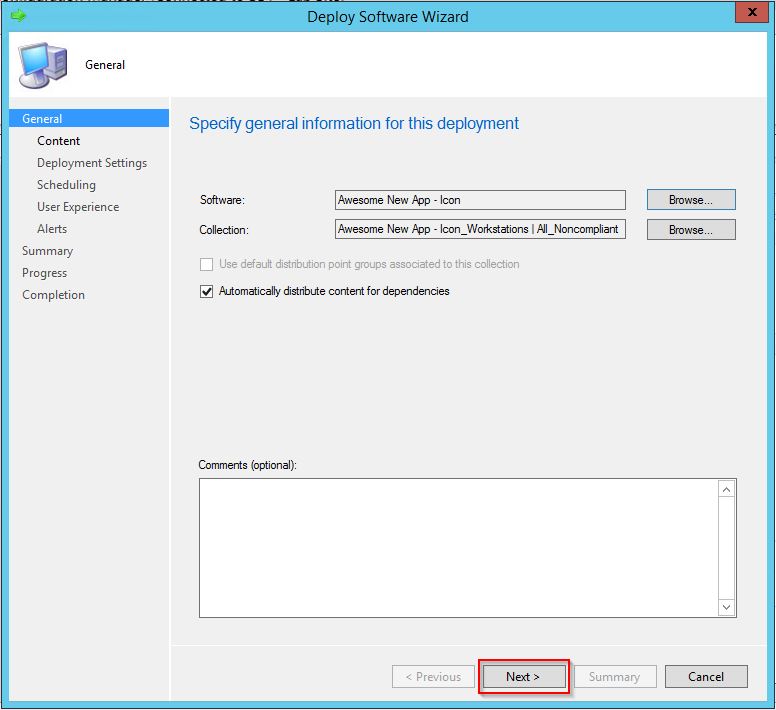
9 . Click Next
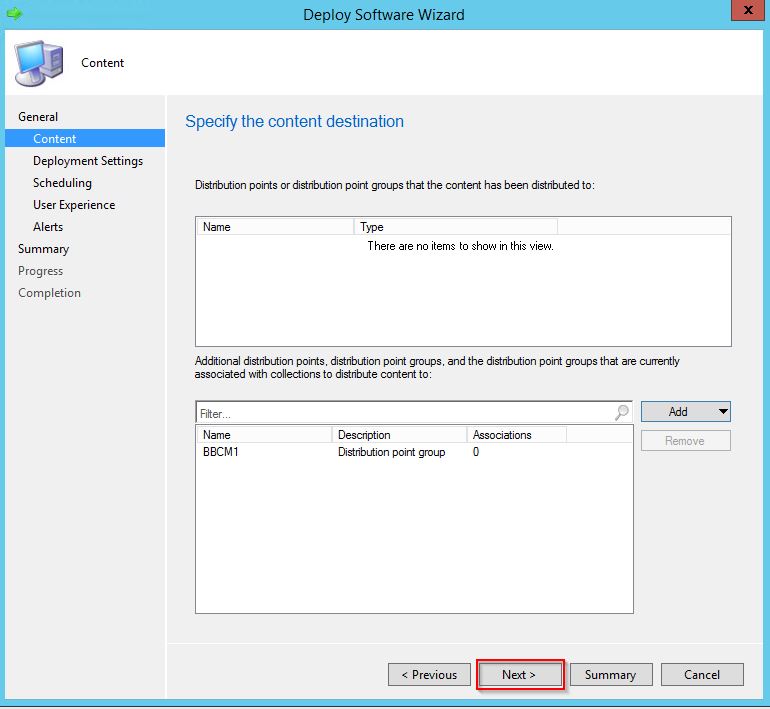
10 . Click Add and choose a Distribution Point or Distribution Point Group to distribute the Application Content to
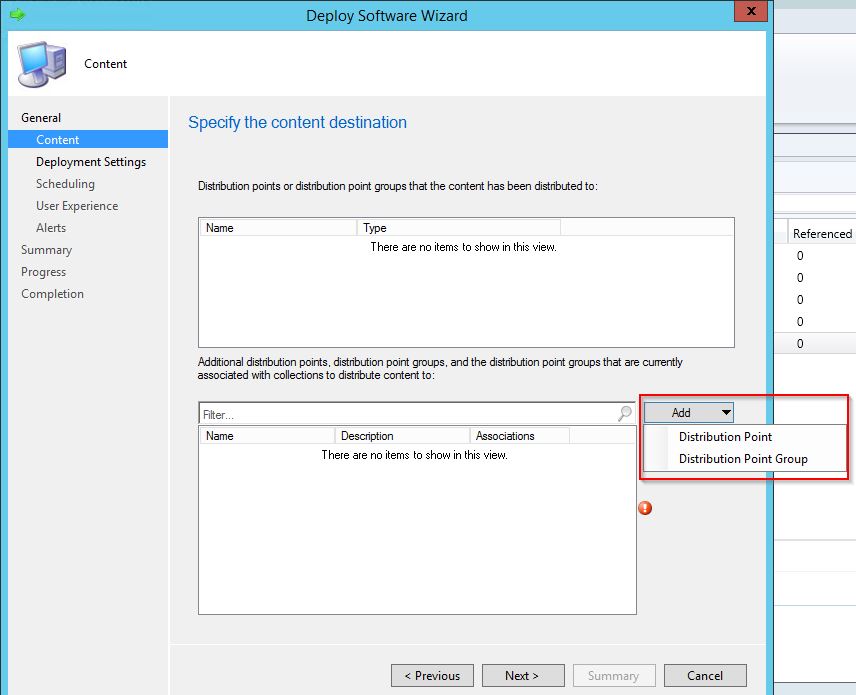
11 . Select the Distribution Point or Distribution Point Group and click OK
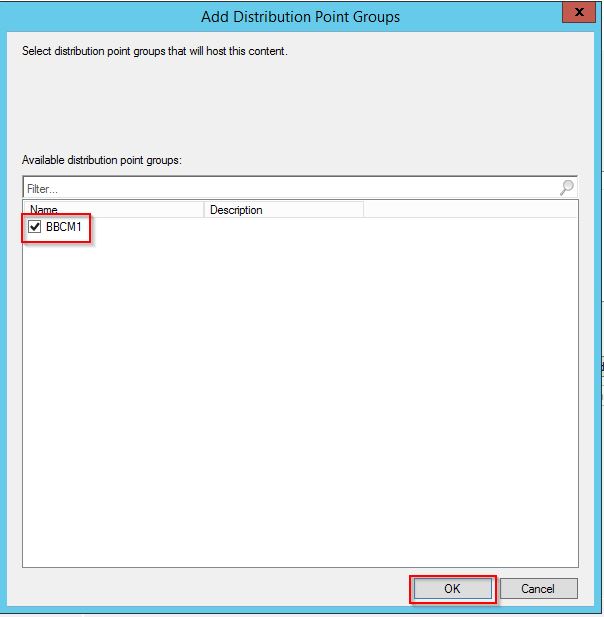
12 . Click Next
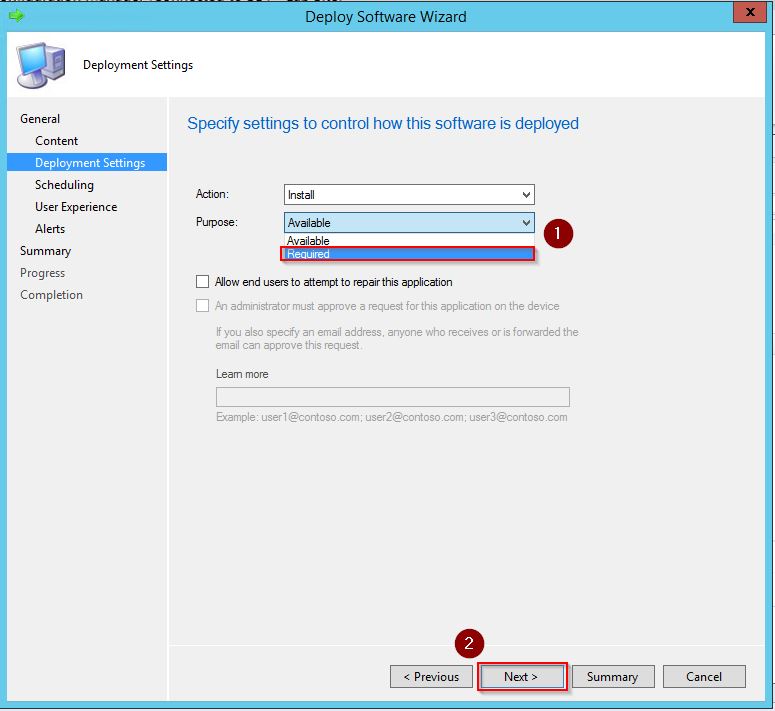
13 . Select Required from the drop down list and click Next
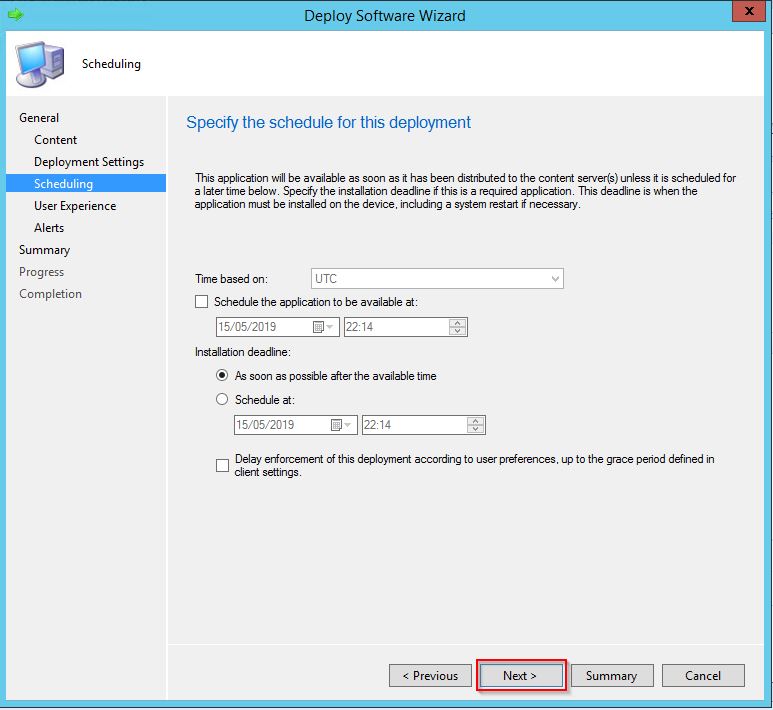
14 . To Deploy the Application ASAP, leave these setting as Default and click Next
15 . In the User Notifications drop down box, choose Hide in Software Center and all Notifications and click Next
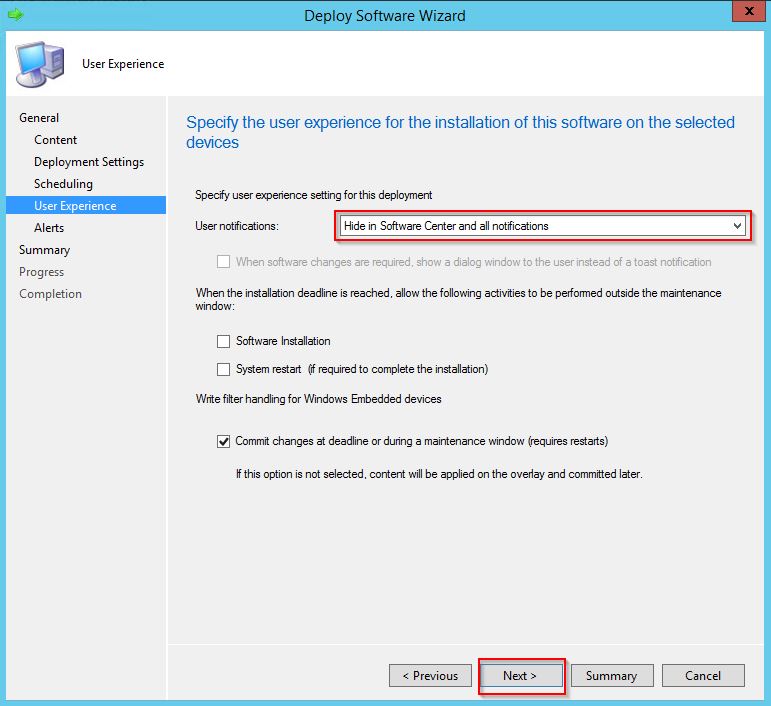
16 . Click Next
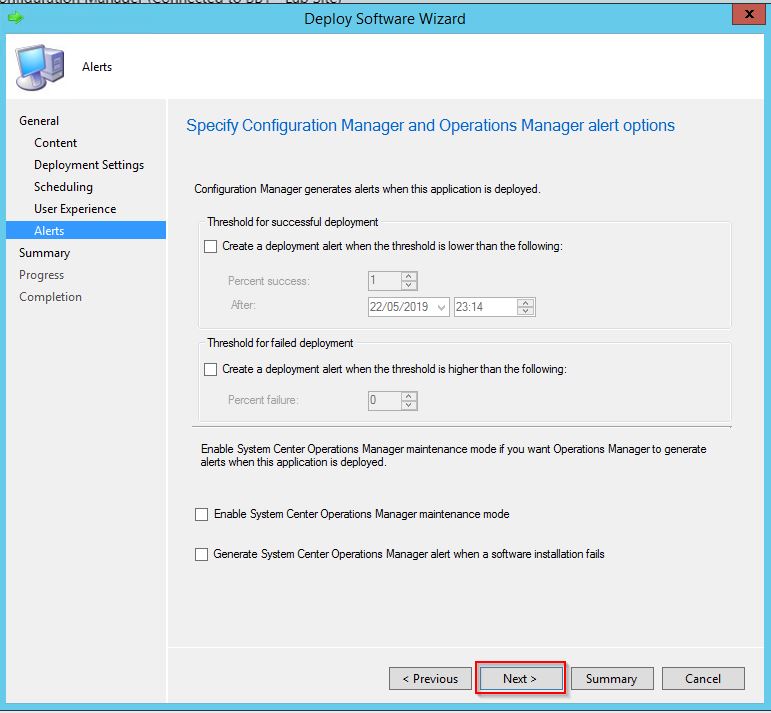
17 . Click Next
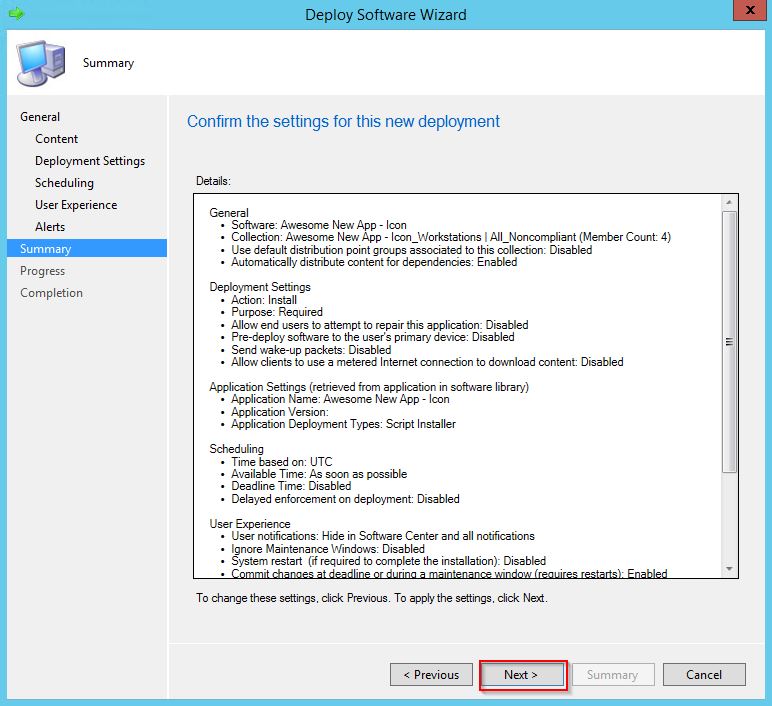
18 . Click Close
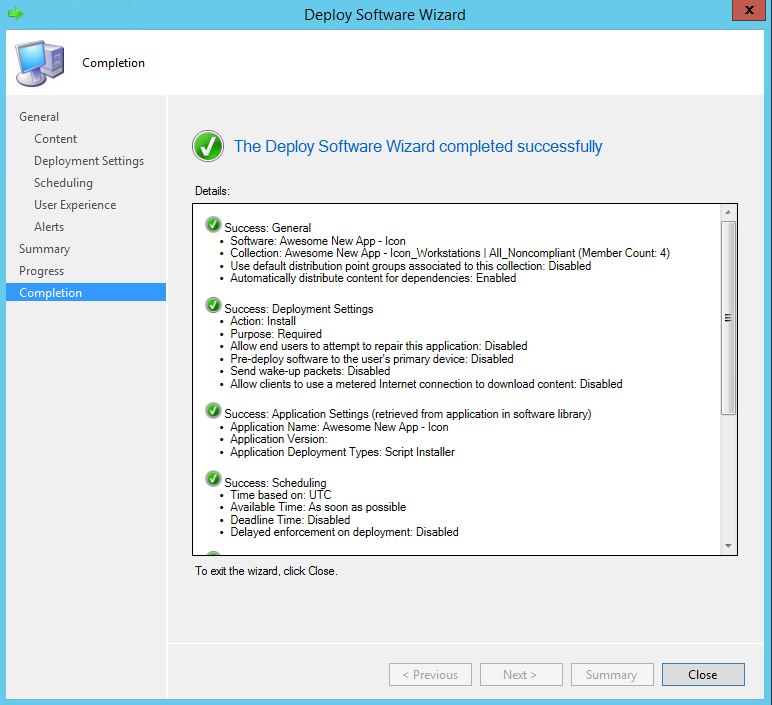
At the next Computer Policy refresh interval, the Policy Agent will run and our clients will get the new Deployment for Awesome New App – Icon
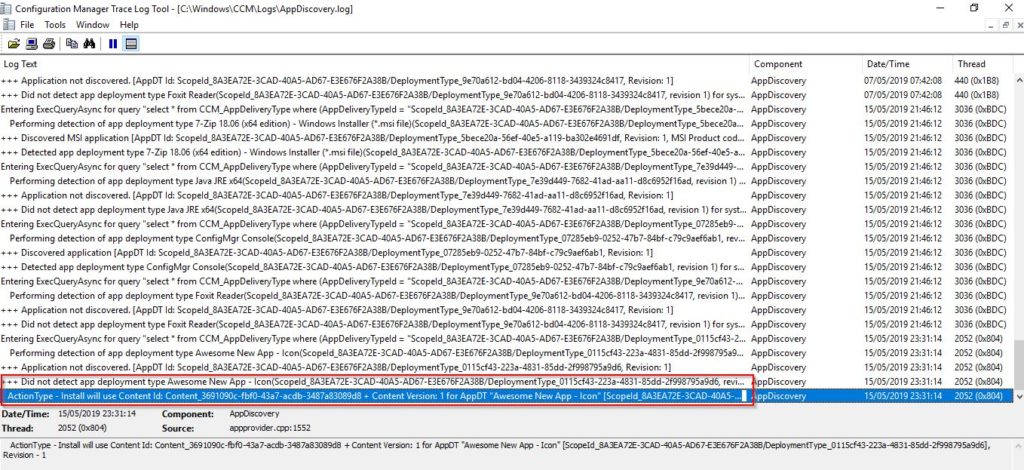
We can check C:\Windows\CCM\Logs\AppDiscovery.log
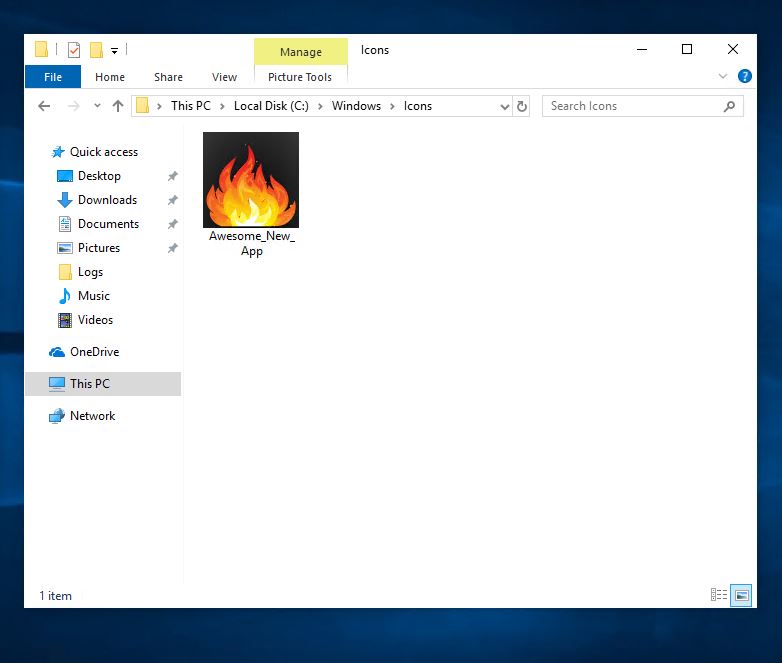
Voila, we have our .ico file in our folder
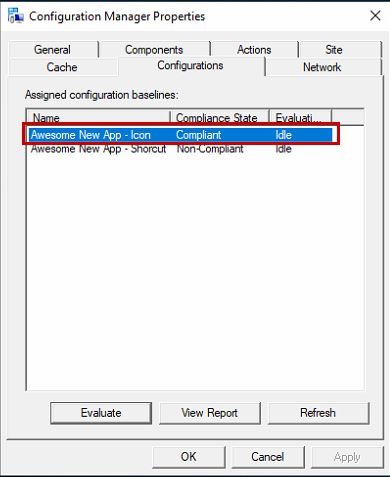
At the next CB evaluation schedule, because the .ico is now on the client, the CB should return a Compliance State of Compliant
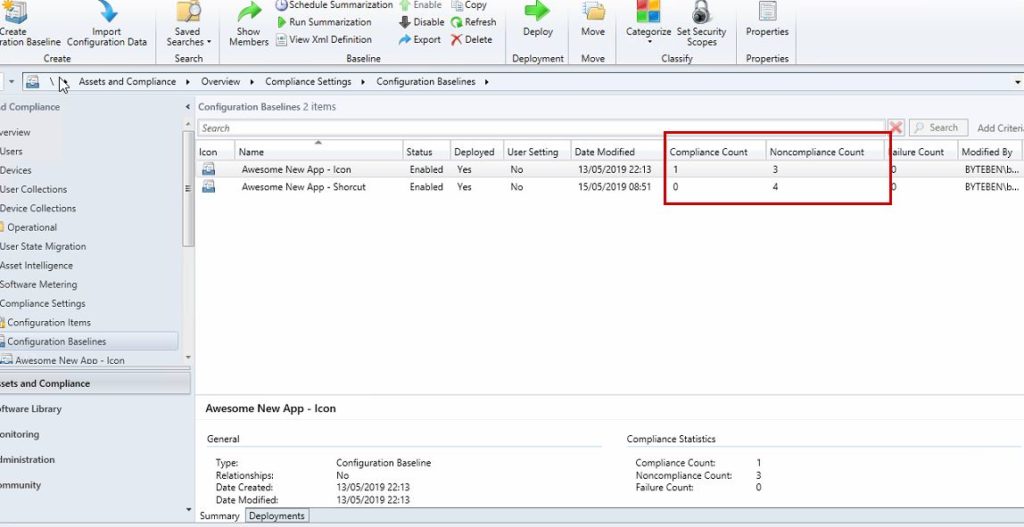
If we check back in the SCCM Console, the Compliance status for clients in the CB will be updated (be patient)
8. Re-mediate any client that fails the Configuration Baseline Evaluation for the Desktop Shortcut ⏏
In Section 7 we looked at re-mediating Clients that did not have our custom .ico file. In this section we will perform similar steps to re-mediate the missing Desktop Shortcut on Non-Compliant Clients. We will omit screenshots in this section as they are similar to the previous section
1 . From the SCCM Admin Console, navigate to Assets and Compliance > Compliance Settings > Configuration Baselines
- Select the Baseline where you wish to deploy the Application Awesome New App – Shortcut to Non-Compliant clients
- Select the Deployments tab
- Select the Deployment
- On the Ribbon menu, click Create New Collection and choose Non-Compliant
2 . In the Create Device Collection wizard, click Next
3 . In the Define Membership Rules for this Collection window, click Next
4 . Click Next in the Summary Windows
5 . Click Close to complete the Create Device Collection Wizard
6 . To deploy our Awesome New App – Icon Application to this Collection
- Highlight the Collection
- On the Ribbon menu, click Deploy
- Select Application
7 . In the Deploy Software Wizard, click Browse
8 . Select Awesome New App – Shortcut and click OK
9 . Click Next
10 . Click Add and choose a Distribution Point or Distribution Point Group to distribute the Application Content to
11 . Select the Distribution Point or Distribution Point Group and click OK
12 . Click Next
13 . Select Required from the drop down list and click Next
14 . To Deploy the Application ASAP, leave these setting as Default and click Next
15 . In the User Notifications drop down box, choose Hide in Software Center and all Notifications and click Next
16 . Click Next
17 . Click Next
18 . Click Close
As in the previous section for our custom .ico, at the next Computer Policy refresh interval, the Policy Agent will run and our clients will get the new Deployment for Awesome New App – Shortcut
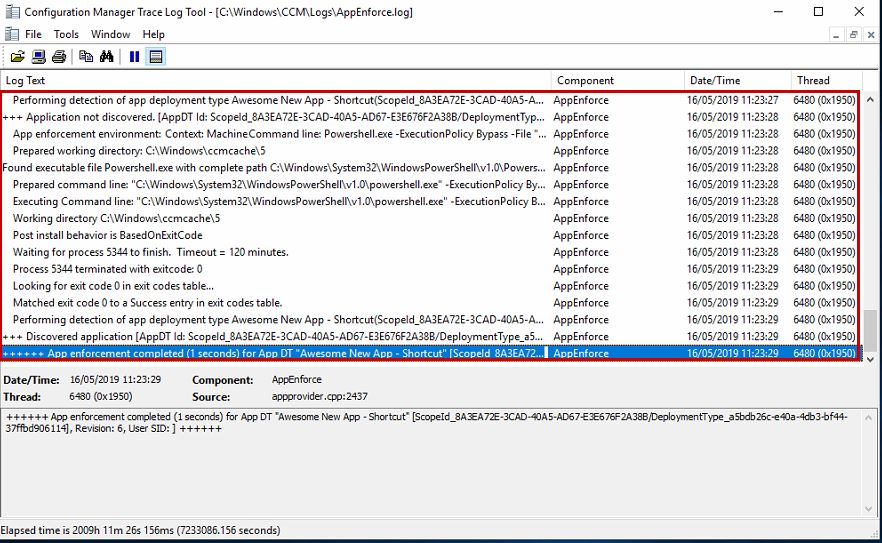
We can see in C:\Windows\CCM\Logs\AppEnforce.log that the Application was installed
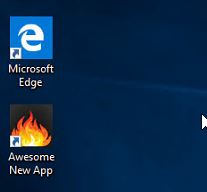
We can also see our new Desktop Shortcut…using our custom .ico file!
Conclusion ⏏
In this, long, post we learned how to create an Application for our our new Desktop Shortcut and our custom .ico file. We also looked at creating Configuration Items and Configuration Baselines to identify Clients that were missing the Desktop Shortcut or custom .ico file. We then deployed those Applications to the Non-Compliant clients and re-mediated them.
As i said at the beginning of this post, there are lots of ways to skin the SCCM cat. I personally use Group Policy Preferences to deliver the Shortcut but then use an SCCM Application to deliver, when required, a custom .ico file
I hope I have given you an understanding of how you could use Configuration Items and Configuration Baselines in your environment to re-mediate some of the daily challenges us admins face.

Thank you very much for this post! However, I have followed these steps exactly, and in my testing everything works as far as to download the application files to the ccmcache folder but then never executes the scripts to create the icon folder, deploy the shortcut, etc. I don’t see any errors but also not sure if I am checking the correct logs. I have tested the scripts locally and they definitely work. Any suggestions for how to determine why it would not be completing that final step?
Thanks in advance!
Hey, did you figure this out?
Sorry I didn’t pick up on your comment Kyle – are you still struggling with this?
Hey Ben, no problem at all. We could never get this to work unfortunately, all the pieces were there but the final step of the script running against the deployed to client just wouldn’t take. We ultimately used the ‘Run Script’ option against a collection which did give us the results we were looking for.
If the need arises again I’ll be sure to check back and report if any other/more problems though.
Thanks for checking in!