My good friend Leon over at http://leonashtonleatherland.blogspot.com/ posed a topic over chat re: Offline Servicing a WIM with SCCM. Not having looked at this before, I thought I would take the time to consider it for the new Windows 10 1809 WIM used in our OSD Task Sequences.
This post covered the basics for modifying and servicing the Windows 10 1809 WIM. We will be looking at only the install.wim but considerations should be made to the upgrade media too. We cover installing some Features on demand to get the en-gb language features and the latest SSU/LCU. There are nicer ways to service the WIM if you look after a larger environment. David Segura has a great tool called #OSBuilder https://www.osdeploy.com/osbuilder/overview which should demand your attention.
Offline Servicing in SCCM is a great way to keep your WIM updated with the latest SSU/LCU and other Security Updates. It will cut down your post OSD remediation by a mile. We can simply import the default Install.wim from the Windows 10 boot media into SCCM and use that as our image for our Task Sequence..but here it comes
The Challenge
Windows is a bit choosy. For example, a common task performed when servicing a WIM is installing Language Packs or Features on Demand. It is recommended to install the Language Pack before installing Features on Demand and then the SSU/ LCU. It makes sense, the LCU might include updates to the aforementioned so we should be installing it first.
TIP: If you specify a language or locale in the “Specialize” pass of your unattend.xml e.g. en-gb and you DO NOT install the en-gb Language Features, your users will be prompted to install it when they first log in. Not ideal in an Enterprise environment.
Another challenge with the OOB WIM – it contains 11 Indexes. If you choose to Offline Service the original WIM, I hope you like coffee. The updates will iterate through each Index taking more than enough time out of your available day.

DISM is your friend.
The Deployment Image Servicing and Management (DISM) tool is very powerful. It comes as part of your OS and is accessible from a PowerShell or Command Prompt window. DISM lets you enumerate drivers and packages, modify configuration settings, add and remove drivers, add Windows features and more. DISM can be used to service VHD/VHDX’s, WIM’s and Online images (live OS). New with DISM in Windows 10 is the ability to compress OS images and provisioning packages.
More information on the DISM tool can be found at https://docs.microsoft.com/en-us/windows-hardware/manufacture/desktop/service-a-windows-image-using-dism
Topics Covered in this post
- Downloading and Mounting the Windows 10 1809 ISO
- Examining the WIM Indexes
- Deleting Images
- Installing the latest Language Features
- Optimising the Image
- Installing the latest SSU and LCU
Downloading and Mounting the Windows 10 1809 ISO
First we need to download the latest Windows 10 1809 ISO from your favourite source. The assumption is you are using the VLSC.
1 – Visit https://www.microsoft.com/Licensing/servicecenter/default.aspx
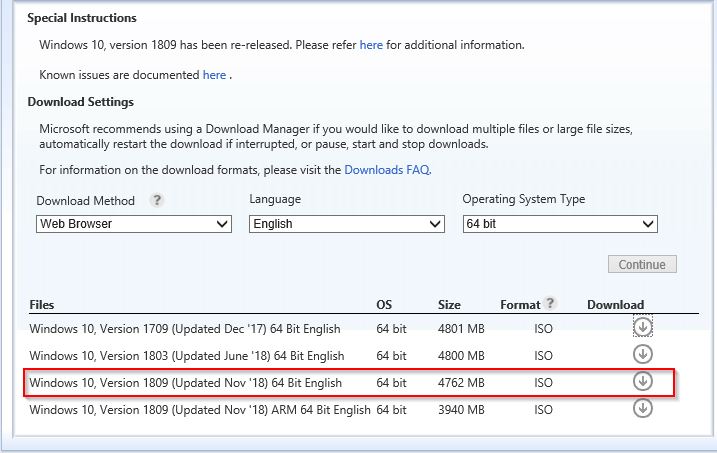
2 – Download the Latest Windows 10 ISO (1809 Nov 18)

3 – Once the ISO is downloaded, mount it

4 – Navigate to the mounted ISO: (drive):\sources and copy out install.wim to a new folder on your local disk. In this example we use C:\WIM

Examining the WIM Indexes
Now we have our WIM, lets play. From a Command Prompt, type:-
|
1 |
dism /get-wiminfo /wimfile:install.wim |
Deployment Image Servicing and Management tool
Version: 10.0.17134.1Details for image : install.wim
Index : 1
Name : Windows 10 Education
Description : Windows 10 Education
Size : 14,605,880,191 bytesIndex : 2
Name : Windows 10 Education N
Description : Windows 10 Education N
Size : 13,792,400,262 bytesIndex : 3
Name : Windows 10 Enterprise
Description : Windows 10 Enterprise
Size : 14,605,950,937 bytesIndex : 4
Name : Windows 10 Enterprise N
Description : Windows 10 Enterprise N
Size : 13,792,293,789 bytesIndex : 5
Name : Windows 10 Pro
Description : Windows 10 Pro
Size : 14,604,374,236 bytesIndex : 6
Name : Windows 10 Pro N
Description : Windows 10 Pro N
Size : 13,790,697,370 bytesIndex : 7
Name : Windows 10 Pro Education
Description : Windows 10 Pro Education
Size : 14,605,809,953 bytesIndex : 8
Name : Windows 10 Pro Education N
Description : Windows 10 Pro Education N
Size : 13,792,329,124 bytesIndex : 9
Name : Windows 10 Pro for Workstations
Description : Windows 10 Pro for Workstations
Size : 14,605,844,838 bytesIndex : 10
Name : Windows 10 Pro N for Workstations
Description : Windows 10 Pro N for Workstations
Size : 13,792,364,459 bytesIndex : 11
Name : Windows 10 Enterprise for Virtual Desktops
Description : Windows 10 Enterprise for Virtual Desktops
Size : 14,605,915,544 bytesThe operation completed successfully.
Wow. That’s a lot of Indexes!
Lets go one step further, lets check the version of Windows for the Index we are interested in:-
|
1 |
dism /get-wiminfo /wimfile:install.wim /index:3 |
Deployment Image Servicing and Management tool
Version: 10.0.17134.1
Details for image : install.wim
Index : 3
Name : Windows 10 Enterprise
Description : Windows 10 Enterprise
Size : 14,605,950,937 bytes
WIM Bootable : No
Architecture : x64
Hal :
Version : 10.0.17763
ServicePack Build : 107
ServicePack Level : 0
Edition : Enterprise
Installation : Client
ProductType : WinNT
ProductSuite : Terminal Server
System Root : WINDOWS
Directories : 19468
Files : 90618
Created : 29/10/2018 – 23:03:05
Modified : 29/10/2018 – 23:18:43
Languages :
en-US (Default)
The operation completed successfully.
Deleting Images
The “/delete-image” command option, as per Microsoft, “deletes only the metadata entries and XML entries. It does not delete the stream data and does not optimize the .wim file”. Cool – we can optimize it later 🙂
The /delete-image option does not apply to VHDs.
As we have eluded to above. We are only interested in the Enterprise Index (3). So lets remove the other Indexes.
The /delete image option syntax should look similar to:-
|
1 |
Dism /Delete-Image /ImageFile:<path_to_image_file> {/Index:<image_index> | /Name:<image_name>} [/CheckIntegrity] |
So if we were deleting a single index from our WIM, it would look something like this:-
|
1 |
Dism /Delete-Image /ImageFile:Install.wim /Index:1 /CheckIntegrity |
The /CheckIntegrity option detects and tracks WIM corruption. The process is stopped if corruption is detected.
You will notice it doesnt take long to delete the Index. The operation is not removing a vast amount of files, it is simply deleting XML and and metadata entries.
Repeat the above command for the remaining entries to leave us with just the single, Enterprise Index. NOTE: The Index numbers in the WIM change after each iteration of the command. It may be safer to use the /Name option. I have not looked at scripting this, but the following may be useful. You can copy and past the whole block into a command prompt, only one index is processed at a time.
|
1 2 3 4 5 6 7 8 9 10 |
Dism /Delete-Image /ImageFile:Install.wim /Name:"Windows 10 Education" /CheckIntegrity Dism /Delete-Image /ImageFile:Install.wim /Name:"Windows 10 Education N" /CheckIntegrity Dism /Delete-Image /ImageFile:Install.wim /Name:"Windows 10 Enterprise N" /CheckIntegrity Dism /Delete-Image /ImageFile:Install.wim /Name:"Windows 10 Pro" /CheckIntegrity Dism /Delete-Image /ImageFile:Install.wim /Name:"Windows 10 Pro N" /CheckIntegrity Dism /Delete-Image /ImageFile:Install.wim /Name:"Windows 10 Pro Education" /CheckIntegrity Dism /Delete-Image /ImageFile:Install.wim /Name:"Windows 10 Pro Education N" /CheckIntegrity Dism /Delete-Image /ImageFile:Install.wim /Name:"Windows 10 Pro for Workstations" /CheckIntegrity Dism /Delete-Image /ImageFile:Install.wim /Name:"Windows 10 Pro N for Workstations" /CheckIntegrity Dism /Delete-Image /ImageFile:Install.wim /Name:"Windows 10 Enterprise for Virtual Desktops" /CheckIntegrity |
After running the above commands, you can re-run /get-wiminfo option and see the single Index left
|
1 |
dism /get-wiminfo /wimfile:install.wim |
PS C:\WIM> dism /get-wiminfo /wimfile:install.wim
Deployment Image Servicing and Management tool
Version: 10.0.17134.1
Details for image : install.wim
Index : 1
Name : Windows 10 Enterprise
Description : Windows 10 Enterprise
Size : 14,605,950,937 bytes
The operation completed successfully.
Installing the Latest Language Features
We want en-gb not en-us Language Features so head back over to the VLSC and download the FOD Disk 1.
1 – Visit https://www.microsoft.com/Licensing/servicecenter/default.aspx
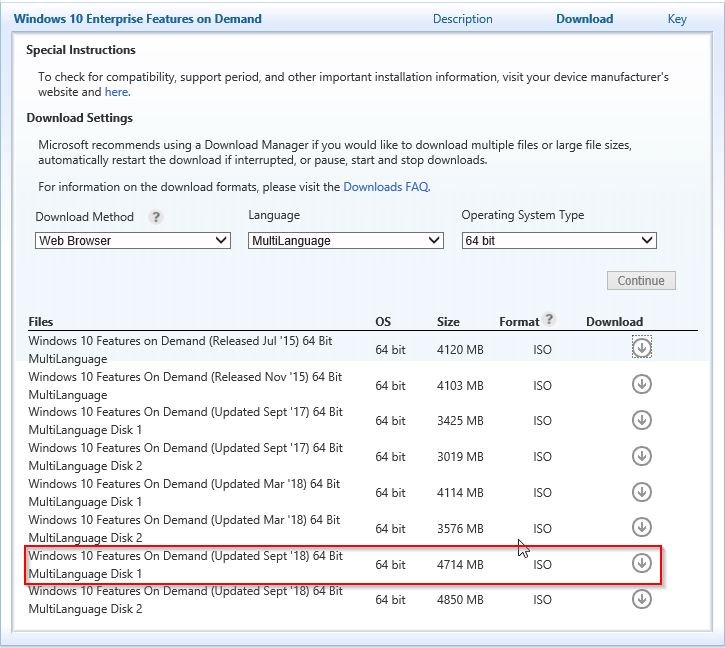
2 – Download the “Windows 10 Features On Demand (Updated Sept ’18) 64 Bit MultiLanguage Disk 1”

3 – Mount the ISO
4 – Find the “en-gb” language feature CABs and copy them out to a folder, e.g. C:\LP

- Microsoft-Windows-LanguageFeatures-Basic-en-gb-Package~31bf3856ad364e35~amd64~~.cab
- Microsoft-Windows-LanguageFeatures-Handwriting-en-gb-Package~31bf3856ad364e35~amd64~~.cab
- Microsoft-Windows-LanguageFeatures-OCR-en-gb-Package~31bf3856ad364e35~amd64~~.cab
- Microsoft-Windows-LanguageFeatures-Speech-en-gb-Package~31bf3856ad364e35~amd64~~.cab
- Microsoft-Windows-LanguageFeatures-TextToSpeech-en-gb-Package~31bf3856ad364e35~amd64~~.cab
5 – Now we need to Mount the WIM so we can start the process of installing the Language Features. Lets mount it in the folder C:\Mountwim
|
1 2 |
MD C:\Mountwim Dism /Mount-Image /ImageFile:install.wim /Index:1 /MountDir:"C:\Mountwim" |


6 – For prudence sake, lets check the language features are not in the image.
|
1 |
Dism /Image:"C:\Mountwim" /Get-Packages |
PS C:\WIM> Dism /Image:”C:\Mountwim” /Get-Packages
Deployment Image Servicing and Management tool
Version: 10.0.17134.1
Image Version: 10.0.17763.107
Packages listing:
Package Identity : Microsoft-OneCore-ApplicationModel-Sync-Desktop-FOD-Package~31bf3856ad364e35~amd64~~10.0.17763.1
State : Installed
Release Type : OnDemand Pack
Install Time : 15/09/2018 09:07
Package Identity : Microsoft-Windows-Client-LanguagePack-Package~31bf3856ad364e35~amd64~en-US~10.0.17763.1
State : Installed
Release Type : Language Pack
Install Time : 15/09/2018 09:06
Package Identity : Microsoft-Windows-FodMetadata-Package~31bf3856ad364e35~amd64~~10.0.17763.1
State : Installed
Release Type : Feature Pack
Install Time : 15/09/2018 09:07
Package Identity : Microsoft-Windows-Foundation-Package~31bf3856ad364e35~amd64~~10.0.17763.1
State : Installed
Release Type : Foundation
Install Time : 15/09/2018 07:36
Package Identity : Microsoft-Windows-Hello-Face-Migration-Package~31bf3856ad364e35~amd64~~10.0.17763.1
State : Installed
Release Type : OnDemand Pack
Install Time : 15/09/2018 09:06
Package Identity : Microsoft-Windows-Hello-Face-Package~31bf3856ad364e35~amd64~~10.0.17763.1
State : Installed
Release Type : OnDemand Pack
Install Time : 15/09/2018 09:06
Package Identity : Microsoft-Windows-InternetExplorer-Optional-Package~31bf3856ad364e35~amd64~~11.0.17763.1
State : Installed
Release Type : OnDemand Pack
Install Time : 15/09/2018 09:06
Package Identity : Microsoft-Windows-LanguageFeatures-Basic-en-us-Package~31bf3856ad364e35~amd64~~10.0.17763.1
State : Installed
Release Type : OnDemand Pack
Install Time : 15/09/2018 09:07
Package Identity : Microsoft-Windows-LanguageFeatures-Handwriting-en-us-Package~31bf3856ad364e35~amd64~~10.0.17763.1
State : Installed
Release Type : OnDemand Pack
Install Time : 15/09/2018 09:07
Package Identity : Microsoft-Windows-LanguageFeatures-OCR-en-us-Package~31bf3856ad364e35~amd64~~10.0.17763.1
State : Installed
Release Type : OnDemand Pack
Install Time : 15/09/2018 09:07
Package Identity : Microsoft-Windows-LanguageFeatures-Speech-en-us-Package~31bf3856ad364e35~amd64~~10.0.17763.1
State : Installed
Release Type : OnDemand Pack
Install Time : 15/09/2018 09:07
Package Identity : Microsoft-Windows-LanguageFeatures-TextToSpeech-en-us-Package~31bf3856ad364e35~amd64~~10.0.17763.1
State : Installed
Release Type : OnDemand Pack
Install Time : 15/09/2018 09:07
Package Identity : Microsoft-Windows-MediaPlayer-Package~31bf3856ad364e35~amd64~~10.0.17763.1
State : Installed
Release Type : OnDemand Pack
Install Time : 15/09/2018 09:07
Package Identity : Microsoft-Windows-QuickAssist-Package~31bf3856ad364e35~amd64~~10.0.17763.1
State : Installed
Release Type : OnDemand Pack
Install Time : 15/09/2018 09:06
Package Identity : Microsoft-Windows-TabletPCMath-Package~31bf3856ad364e35~amd64~~10.0.17763.1
State : Installed
Release Type : OnDemand Pack
Install Time : 15/09/2018 09:06
Package Identity : OpenSSH-Client-Package~31bf3856ad364e35~amd64~~10.0.17763.1
State : Installed
Release Type : OnDemand Pack
Install Time : 15/09/2018 09:07
Package Identity : Package_for_RollupFix~31bf3856ad364e35~amd64~~17763.107.1.3
State : Installed
Release Type : Update
Install Time : 29/10/2018 22:39
The operation completed successfully.
7 – Nope, the “en-gb” packs are not there. Lets go and install them. You can copy the block below and paste them into your command window:-
|
1 2 3 4 5 |
Dism /Image:"C:\Mountwim" /Add-Package /PackagePath="C:\LP\Microsoft-Windows-LanguageFeatures-Basic-en-gb-Package~31bf3856ad364e35~amd64~~.cab" Dism /Image:"C:\Mountwim" /Add-Package /PackagePath="C:\LP\Microsoft-Windows-LanguageFeatures-Handwriting-en-gb-Package~31bf3856ad364e35~amd64~~.cab" Dism /Image:"C:\Mountwim" /Add-Package /PackagePath="C:\LP\Microsoft-Windows-LanguageFeatures-OCR-en-gb-Package~31bf3856ad364e35~amd64~~.cab" Dism /Image:"C:\Mountwim" /Add-Package /PackagePath="C:\LP\Microsoft-Windows-LanguageFeatures-Speech-en-gb-Package~31bf3856ad364e35~amd64~~.cab" Dism /Image:"C:\Mountwim" /Add-Package /PackagePath="C:\LP\Microsoft-Windows-LanguageFeatures-TextToSpeech-en-gb-Package~31bf3856ad364e35~amd64~~.cab" |

8 – Running the /get-packages option again we should see the new en-gb language packs (image chopped off to save your scroll wheel)

9 – I have not covered installing Language Packs (LPs) or Language Interface Packs (LIPs) in this post. It is a very similar process to above. Head over to this link for more info https://docs.microsoft.com/en-us/windows-hardware/manufacture/desktop/add-language-packs-to-windows
10 – We now need to commit the changes in this image using the /Commit-Image option in DISM
|
1 |
Dism /Commit-Image /MountDir:"C:\Mountwim" /CheckIntegrity |

Optimising the Image
This one is a bit null and void for this blog post. The /cleanup-image option
reduces the footprint of a Windows image by “cleaning up superseded components and resetting the base of the superseded components”. That’s the headline from MS.
We have only added the Language Features for en-gb so far so we wont see too many benefits by cleaning up the image. Let’s show you how anyway:-
Run the /cleanup-option in DISM
|
1 |
Dism /Image:C:\Mountwim /cleanup-image /StartComponentCleanup /ResetBase |
11 – Finally Un-Mount the image using the /Unmount-Image option in DISM.
|
1 |
Dism /Unmount-image /MountDir:C:\Mountwim /Commit |


Our new WIM is massively reduced in size – not. Remember, we have just installed a bunch of hefty language packs. The WIM will larger than when we first copied it out of the original Windows 10 1809 media.
Installing the latest SSU and LCU
Offline Servicing
This is the fun part, the reason we are all here. SCCM is my favourite of all Microsoft tools at the moment. What do we all like when deploying OS images with a Task Sequence? Speed right! What two words never go in the same sentence… “Speed” and “Remediation”. What better way to slow down your task sequence than installing Windows Updates.
Microsoft had a fun time in October 2018. Windows 10 1809 had a couple of false starts and was eventually re-released in November 2018. The problems didn’t stop there. Event the November release plagued a number of users with mapped drives being disconnected at logon.
Fortunately, Microsoft released an update in November to resolve all the problems in the world..well not quite. They released KB4469342 https://support.microsoft.com/en-gb/help/4469342/november292018kb4469342osbuild17763167 to address the issue. Microsoft also released a Servicing Stack Update which “should” be installed before installing the update KB4470788 above, https://support.microsoft.com/en-gb/help/4470788/servicing-stack-update-for-windows-10
So to compliment the awesome WIM we just created, lets now use SCCM to Offline Service it with the above updates. I will not be covering other updates which should be considered for Offline Servicing e.g Adobe Flash Security Updates although these, in my view, should also be installed with Offline Servicing.
Lets import our new Operating System Image into SCCM (If you dont know how to do this, head over to https://docs.microsoft.com/en-us/sccm/osd/get-started/manage-operating-system-images)

You can see we only have 1 Index. Yes! Only One Index to Service – this should speed Offline Servicing by 1000% – literally. We started off with 11 Indexes and now we have only 1.
Hint: You need to ensure your SUP has synchronised and downloaded updates KB4470788 and KB4469342
1 – Right Click the Operating System Image and choose “Schedule Updates

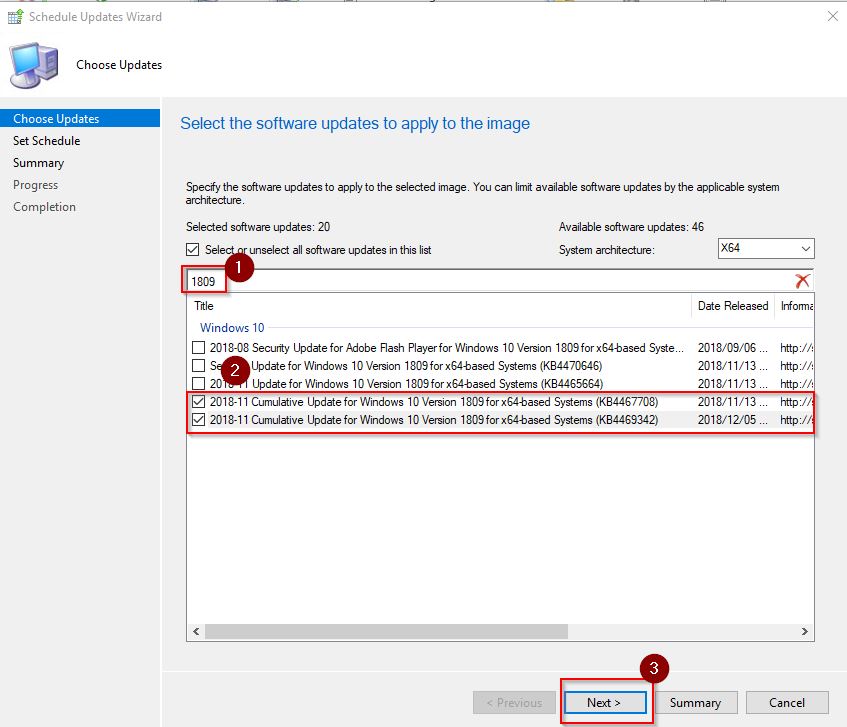
2 – Filter the result by “1809”, select the two KBs and choose “Next”

3 – Choose “Next” to begin the Offline Servicing as soon as possible

4 – Review Settings and choose “Next”

You can monitor the progress of the WIM update.
- The Image will be mounted in your server root e.g. C:\ConfigMgr_OfflineImageServicing
- Use OfflineServicingMgr.log to monitor progress


OfflineImageServicing.log after successful Offline Servicing

That’s it. Don’t forget to update the Distribution Points with your new, shiny OS image.
Summary
This post covered the basics for modifying and servicing the Windows 10 1809 WIM. There are nicer ways to service the WIM if you look after a larger environment. David Segura has a great tool called #OSBuilder https://www.osdeploy.com/osbuilder/overview which should demand your attention.
As a rule of thumb, don’t go overloading the WIM with updates. I would recommend starting with a fresh WIM when Offline Servicing with the latest SSU and LCU. Traditionally, cleaning up the WIM has been troublesome but the process seems quite smooth in 1809.
Big thank you to Adam Gross, Ari Saastamoinen, Manel Rodero for some olive branches and sage advice on this post. Check out https://www.asquaredozen.com/ and http://www.manelrodero.com/blog/ and http://arisaastamoinen.com for OSD awesomeness.

Hi Ben. Thanks for all your help. Mike Terrill in his blog https://miketerrill.net/2018/06/23/optimizing-win10-os-upgrade-wim-sizes/ exports the desired index, as opposed to your procedure of deleting the unwanted ones. Can you give me your take on the pros and cons of either method?
Hi Russell,
Great question. To be honest, i normally delete the indexes if i am leaving a few behind e.g. Enterprise and Pro SKU. Mike’s post (great post) along with others suggest exporting the WIM – which is cool too.
I guess either way is acceptable. In hindsight, for this post, I should have probably done an export of the WIM because the example was using a single Index.
Others have shown how you can shrink the WIM using the “DISM Export-Image /Compress:max” method but I haven’t tried this.
Thanks for reading the post 🙂
Before adding the filter (1809) in the Choose Updates page, make sure you uncheck the box to unselect all of the default selected updates before adding a filter. In your example it shows you have only checked 2 updates yet the selected software updates: shows 20 updates.
Very useful article – thank you. I have a question: is it me, or would it have been useful for Microsoft to have enabled us to apply a Baseline selection rather than apply every available update?
Hi Andy,
Thanks for the comment. What kind of thing would you be looking for? For SCCM to identify the most up to date SSU/CU and apply it automatically to the WIM?
Hi Ben, yes, but only those updates I’ve defined as members of a Software Update Group. For example, there may be updates in the All Software Updates I don’t want applied.